Have you ever hung a piece of wall art only to step back and feel like something’s off? Maybe it looks too high, too low, or just awkward on your wall.
Getting the height right can completely change the way your space feels. When your art is hung perfectly, it draws you in, creates balance, and makes your room feel more inviting. You’ll discover simple, practical tips to hang your wall art at the perfect height every time.
Keep reading, and soon your walls will look stunning and just right for your home.
Choosing The Right Height
Choosing the right height to hang wall art is important for balance and style. The right height makes the art easy to see and enjoy. It also fits well with the room’s design and furniture.
Think about who will see the art and how they will use the space. This helps decide the best height to hang your pieces. Small changes can make a big difference in how the art looks and feels.
Average Eye Level
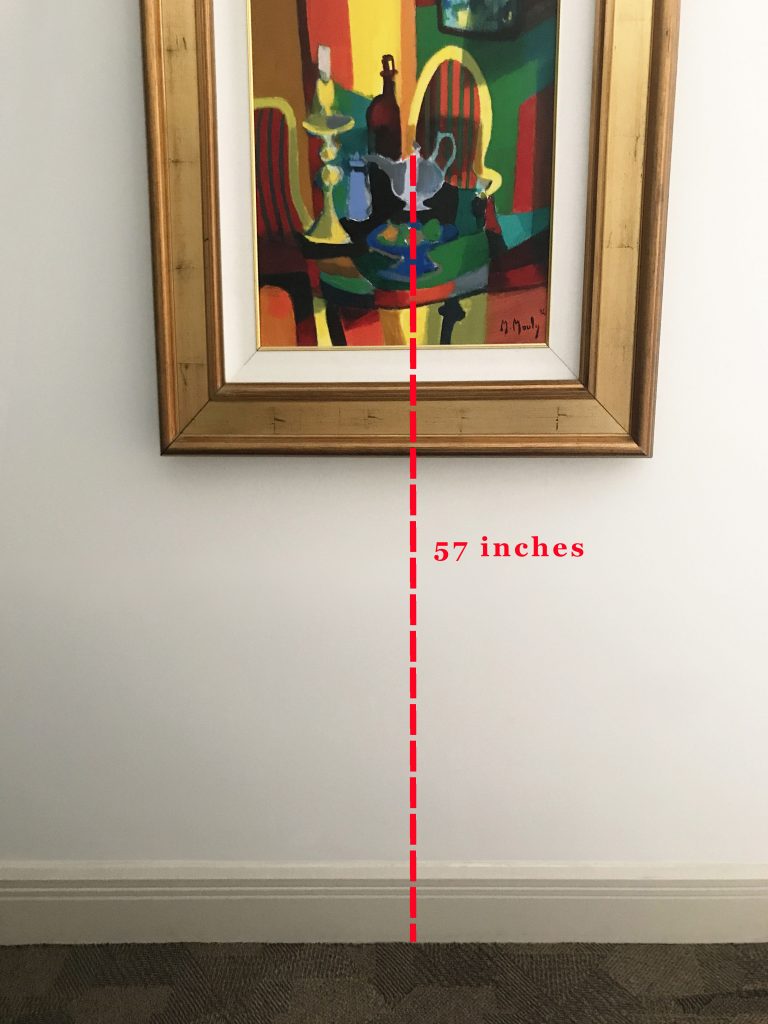
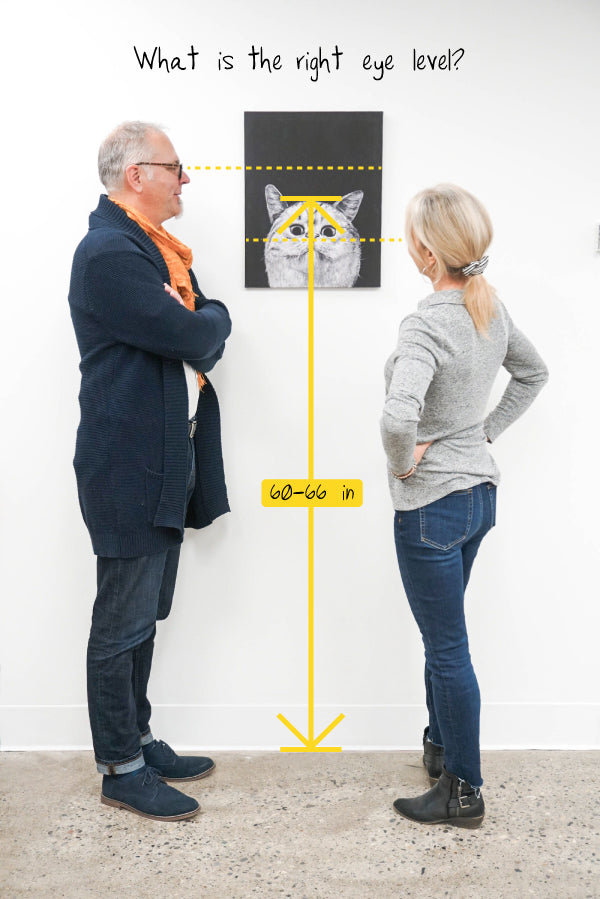
Hang art at average eye level for the best view. This is usually about 57 to 60 inches from the floor to the center of the artwork. This height suits most people and rooms. It creates a natural line for the eyes to follow.
Considering Room Function
Think about how the room is used before hanging art. In dining rooms, lower art can work well near chairs. In hallways, hang art at eye level for standing viewers. In bedrooms, consider the bed height and sight lines.
Adjusting For Furniture
Place art with furniture in mind. Leave about 6 to 12 inches of space above furniture tops. This keeps the art connected to the room’s layout. Avoid hanging art too high or too low above furniture pieces.
Credit: www.parkwestgallery.com
Measuring For Balance
Measuring for balance is key to hanging wall art correctly. Proper measurement ensures the art looks good on your wall. It also helps create harmony in the room. Balance makes the space feel inviting and well-arranged.
Use simple tools like a tape measure and pencil for this task. Small mistakes can make big differences in how the art feels. Take your time and measure carefully for the best results.
Calculating Center Point
Find the center point of your wall first. Measure the width of the wall and divide by two. This gives the middle spot. Next, find the center of your artwork by measuring its width. Mark this point lightly on the back or frame.
Align the artwork’s center with the wall’s center point. This keeps the piece balanced and pleasing to the eye. Adjust the height to eye level for most viewers. This is usually about 57 to 60 inches from the floor.
Spacing Between Multiple Pieces
Plan the space between multiple art pieces carefully. Keep a consistent gap between frames. Usually, 2 to 5 inches works well. Too close feels crowded. Too far apart feels disconnected.
Arrange the pieces on the floor first. This helps you visualize the final look. Use a ruler or tape measure to keep equal spacing. Balance the sizes by placing larger pieces in the center or at eye level.
Tips For Different Wall Types
Different walls need different art hanging tips. The size and purpose of the wall change how high the art should go. Correct placement makes the space look balanced and inviting. Follow these simple tips for common wall types.
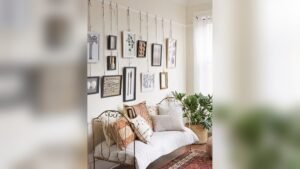
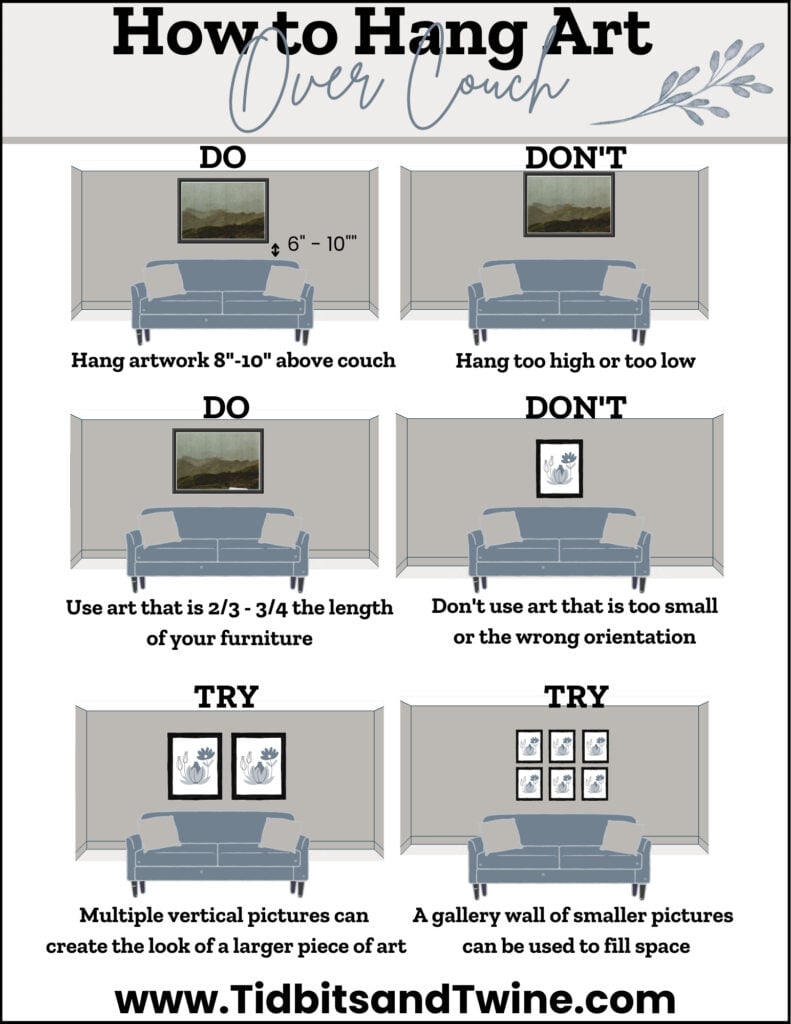
Above Sofas And Mantels
Hang art about 6 to 12 inches above sofas or mantels. This keeps the art close but not crowded. Make sure the art width is about two-thirds the width of the sofa or mantel. This creates a nice visual balance. Keep the center of the art at eye level, around 57 to 60 inches from the floor.
Hallways And Staircases
In hallways, keep art at eye level, about 57 inches from the floor. Use smaller pieces or a series of small frames for a cohesive look. On staircases, follow the angle of the stairs. Hang art so the center lines up with your eye as you walk up or down. This creates a smooth flow and makes the space feel connected.
Gallery Walls
Gallery walls need consistent spacing and height. Keep 2 to 5 inches between each frame. Arrange art so the center line is about 57 inches from the floor. Start with a large piece in the middle. Add smaller pieces around it. This keeps the gallery wall balanced and neat.
Credit: utrdecorating.com
Special Considerations
Special considerations play a big role in deciding how high to hang wall art. These factors affect how the artwork looks and fits in your space. Paying attention to these details helps the art stand out and complements your room’s style.
Artwork Size And Frame
Large artwork needs more space to breathe. Hang big pieces slightly lower to keep them at eye level. Small art looks best grouped or centered on a wall. The frame size also matters. Thick frames make the art look bigger. Thin frames keep the focus on the picture. Balance the frame with the wall and furniture around it.
Lighting Effects
Lighting changes how art looks on your wall. Bright light can highlight colors and details. Avoid hanging art where direct sunlight hits it. Sunlight can fade colors over time. Soft, even lighting works best. Use picture lights or spotlights for extra focus. Check how shadows fall on the art to avoid distractions.
Room Height Variations
Ceiling height affects where to place your art. In rooms with low ceilings, hang art a bit lower. This makes the space feel cozy. For tall rooms, place art higher to fill empty space. Use larger pieces or tall frames to balance the height. Match the art height with furniture size for harmony.
Tools For Accurate Placement
Getting the right height for your wall art needs precise tools. These tools help you place the art exactly where it looks best. Accurate placement makes your room feel balanced and stylish. Below are some common tools to help hang your wall art perfectly.
Using A Tape Measure
A tape measure is the most basic tool for hanging art. Measure the distance from the floor to where the top of the frame will go. Mark this spot lightly with a pencil. Check the center point of your wall to keep the art balanced. Measure twice to avoid mistakes.
Level And Hanging Hardware
A level ensures your art hangs straight. Hold the level on top of the frame before marking the wall. If the bubble is centered, the frame will hang evenly. Use proper hanging hardware like hooks or anchors for better support. The right hardware keeps your art secure and safe.
Templates And Markers
Templates help you plan the exact spot for nails or hooks. Cut paper to match your art’s size and tape it to the wall. Mark the hanging points on the paper. This method saves time and prevents unnecessary holes. Use markers or painter’s tape that won’t damage your walls.
Credit: www.tidbitsandtwine.com
Frequently Asked Questions
How High Should I Hang Wall Art Above Furniture?
Hang wall art about 6 to 12 inches above furniture. This creates visual connection without crowding. Maintain balance and proportion in your room.
What Is The Ideal Height For Hanging Art On Walls?
The ideal height is eye level, around 57 to 60 inches from floor to center. This height suits most people and spaces for comfortable viewing.
Should I Consider Ceiling Height When Hanging Wall Art?
Yes, higher ceilings allow you to hang art slightly higher. Adjust placement proportionally to ceiling height for balanced and appealing wall decor.
How To Hang Multiple Pieces Of Art On A Wall?
Group art at eye level, arranging pieces close together. Keep consistent spacing, around 2 to 4 inches, for a cohesive gallery look.
Conclusion
Hanging wall art at the right height makes a big difference. Keep your eyes level with the center of the art. This makes your room feel balanced and inviting. Measure carefully before you hang to avoid mistakes. Trust your eyes and adjust as needed.
Small changes can improve the whole space. Enjoy your beautifully displayed art every day.
As an Amazon Associate, I earn from qualifying purchases.