
Is your floor lamp flickering or not turning on at all? Before you rush to buy a new one, you might be able to fix it yourself by rewiring it.
Rewiring a floor lamp is easier than you think, and it can save you money while bringing new life to your favorite lighting piece. In this guide, you’ll learn simple, step-by-step instructions that anyone can follow—even if you’ve never done electrical work before.
Stick with me, and by the end, you’ll have a safe, fully working floor lamp that brightens your room just the way you want. Ready to get started? Let’s dive in!

Credit: www.lamppartsrepair.com
Tools And Materials Needed
Before starting to rewire a floor lamp, gather all the necessary tools and materials. Having everything ready makes the process smooth and safe. This section lists the essential tools and parts needed for the job.
Essential Tools
- Screwdrivers (flathead and Phillips) for removing and securing screws
- Wire strippers to remove the insulation from wires
- Needle-nose pliers for bending and holding wires
- Electrical tape to insulate wire connections
- Multimeter to test electrical connections and ensure safety
- Utility knife for cutting wires or insulation
- Wire nuts for connecting and securing wires
Required Replacement Parts
- Replacement lamp cord with plug matching your lamp type
- New socket if the old one is damaged or worn out
- Replacement switch if your lamp has a faulty one
- Heat shrink tubing for extra protection on wire joints

Credit: www.sunmory.com
Safety Precautions
Safety is the first step in rewiring a floor lamp. It protects you from electrical shocks and injuries. Taking simple precautions makes the task safer and easier. Small mistakes can cause big problems. Follow these safety tips closely before starting your work.
Power Off And Unplug
Always turn off the lamp before doing any work. Unplug it from the wall socket. This stops electricity from flowing to the lamp. Never work on a lamp that is still plugged in. It keeps you safe from electric shocks.
Work In A Well-lit Area
Choose a bright place to work on the lamp. Good lighting helps you see wires and parts clearly. It reduces the chance of making mistakes. A well-lit area makes the job faster and safer. Avoid dark or dim spaces for rewiring tasks.
Removing The Old Wiring
Removing the old wiring is the first step to rewiring a floor lamp. It helps to make the lamp safe and functional again. Old wires can be damaged or worn out. Removing them carefully prevents electric shocks or short circuits. Follow these steps to take out the old wiring correctly.
Disassembling The Lamp
Start by unplugging the lamp from the power source. Remove the lampshade and bulb. Look for screws or clips holding the lamp parts together. Use a screwdriver to take off the base or the lamp pole. Keep all small parts safe for reassembly later. Take your time to avoid breaking any piece.
Detaching The Worn Wiring
Locate where the wires connect to the lamp parts. Use pliers or a screwdriver to loosen wire connectors. Gently pull the wires from the socket and switch. Cut any stuck wires with wire cutters. Remove the entire old wire set from the lamp. Check for any leftover pieces and clear them out.
Preparing New Wiring
Preparing new wiring is a key step in rewiring a floor lamp. It ensures safety and proper function. This process involves measuring, cutting, and stripping the wire correctly. Taking time here saves frustration later.
Measuring And Cutting Wire
Start by measuring the length of wire needed. Measure from the lamp base to the socket area. Add a few extra inches to allow for connections. Use a tape measure for accuracy. Mark the wire with a pencil or tape. Use wire cutters to cut the wire cleanly. Avoid jagged or crushed ends that can cause problems.
Stripping Wire Ends
Strip the wire ends carefully to expose the copper. Use a wire stripper tool for best results. Remove about half an inch of insulation from each end. Do not nick or damage the copper wire inside. Twisting the exposed wire strands makes connections easier. Proper stripping ensures good electrical contact and safety.
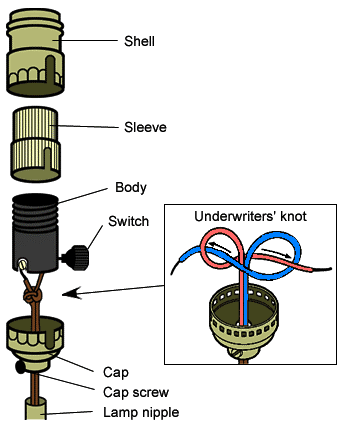
Connecting The New Wiring
Connecting the new wiring is a key step in rewiring your floor lamp. This process ensures the lamp works safely and properly. You must handle the wires with care. Proper connections prevent shorts and electrical hazards.
Follow each step closely. Use the right tools and materials. Take your time for a secure and neat job.
Attaching Wires To The Socket
Start by identifying the socket terminals. Usually, one is for the live wire, and the other for the neutral. Match the wire colors to the correct terminals. Typically, black or brown is live, white or blue is neutral.
Strip about half an inch of insulation from each wire end. Twist the exposed wire strands tightly. Wrap the wire around the terminal screw clockwise. Tighten the screw firmly to hold the wire in place. Avoid loose connections to prevent sparks or flickering.
Securing Wire Connections
After attaching wires, check each connection. Tug gently to test if wires stay secure. Use electrical tape to cover exposed metal parts. This insulation protects against accidental contact.
Group the wires neatly inside the lamp base. Use cable ties to keep them organized. Avoid pinching or bending wires sharply. A clean setup reduces wear and makes future repairs easier.
Reassembling The Lamp
Reassembling the lamp is the final step after rewiring. It brings the lamp back to life. Careful handling ensures safety and proper function. Follow each step carefully for the best results.
Putting Components Back Together
Start by placing the socket back into its holder. Secure it tightly with screws or clips. Next, arrange the wires neatly inside the lamp base. Avoid pinching or bending wires sharply. Attach the lamp harp or shade holder if you removed it. Finally, screw the lampshade back on carefully. Make sure all parts fit snugly and securely.
Testing The Lamp
Plug the lamp into a power outlet. Turn the switch on to check if the bulb lights up. If it does not, unplug immediately and recheck your wiring. Use a different bulb if the first one is faulty. Confirm the switch works smoothly without sparks or flickers. Testing ensures your rewiring job is safe and successful.
Troubleshooting Tips
Troubleshooting a floor lamp after rewiring can save time and effort. It helps find simple mistakes before calling for help. This section guides you through common problems and signals when to get an expert.
Common Wiring Issues
Loose connections cause flickering or no light at all. Check that all wires are tightly connected. Wrong wire placement can stop the lamp from working. Make sure the wires match the color codes. Damaged wires can create shorts and sparks. Replace any wires with cuts or burns. Faulty sockets also prevent the bulb from lighting. Test the socket with a working bulb. A broken switch may block power flow. Try toggling the switch or replacing it.
When To Seek Professional Help
If the lamp still doesn’t work after checks, call an electrician. Sparks, burning smells, or smoke need immediate expert attention. Complex wiring or old lamps might hide hidden faults. Avoid risks with high voltage or unknown wiring. Safety is the top priority when dealing with electricity. Professionals have the right tools and training to fix issues safely.
Credit: location-greenbike.com
Frequently Asked Questions
How Do I Safely Rewire A Floor Lamp?
Turn off and unplug the lamp first. Use insulated tools and check local electrical codes. Follow step-by-step guides to avoid hazards.
What Tools Are Needed To Rewire A Floor Lamp?
You will need wire strippers, screwdrivers, electrical tape, new lamp cord, and a replacement socket if necessary.
How Long Does It Take To Rewire A Floor Lamp?
Rewiring a floor lamp typically takes 30 to 60 minutes, depending on your experience and lamp complexity.
Can I Reuse Old Lamp Parts When Rewiring?
Yes, you can reuse some parts like the lamp base or shade, but replace damaged cords or sockets.
Conclusion
Rewiring a floor lamp is a simple task with the right steps. Take your time and follow safety tips carefully. Using basic tools makes the process easier. This skill can save money and extend your lamp’s life. Always check wires and connections before plugging in.
A well-rewired lamp lights up your room safely. Practice patience, and you will feel confident next time. Now, your lamp is ready to shine bright again.
As an Amazon Associate, I earn from qualifying purchases.