Looking to add a personal touch to your space without breaking the bank? You’re in the right place.
Creating your own wall art is a fun and rewarding way to express your style and make your home truly yours. Imagine turning simple materials into eye-catching pieces that spark conversation and brighten your rooms. Ready to discover easy, creative ideas that anyone can try?
Keep reading, and you’ll find step-by-step tips to transform your walls into stunning works of art. Your perfect DIY project is just ahead!
Choosing The Right Wall Art Style
Choosing the right wall art style shapes the look of your room. It reflects your personality and fits your space. This choice helps create a mood and adds charm. Consider the room’s purpose and your taste. Think about colors, shapes, and themes that inspire you. Here are some popular styles to explore for your DIY wall art project.
Abstract Designs
Abstract designs use shapes, lines, and colors without clear forms. They create energy and movement on your walls. These designs suit modern and creative spaces. You can mix colors and brush strokes freely. Abstract art encourages imagination and personal interpretation. It works well with bold or soft color schemes.
Nature-inspired Themes
Nature-inspired art brings calm and freshness indoors. Think leaves, flowers, animals, or landscapes. These themes connect your home with the outdoors. They add warmth and peace to any room. Use natural colors like greens, browns, and blues. Crafting nature art can be relaxing and fun.
Geometric Patterns
Geometric patterns use shapes like circles, triangles, and squares. They create order and balance on your walls. These patterns fit well in minimalist or modern decor. You can play with symmetry or repeat shapes for effect. Geometric wall art is simple but eye-catching. It adds structure and style to your space.
Typography And Quotes
Typography art features words or phrases with creative fonts. Choose quotes that inspire or make you smile. This style brings personality and meaning to your walls. Use bold or elegant letters to match your room’s vibe. Typography is easy to create and customize. It reminds you of your values and goals every day.
:strip_icc()/decorating-do-it-yourself-wall-art-14-canvas-wall-art-projects-01b-e324094b65a649eba285d31d514c7f1c.jpg)
Credit: www.bhg.com
Materials You Can Use
Creating your own wall art is fun and allows you to personalize your space. Choosing the right materials is key to making pieces that stand out. Many items work well for DIY art projects, and most are easy to find. Use simple supplies to craft beautiful designs that match your style and home.
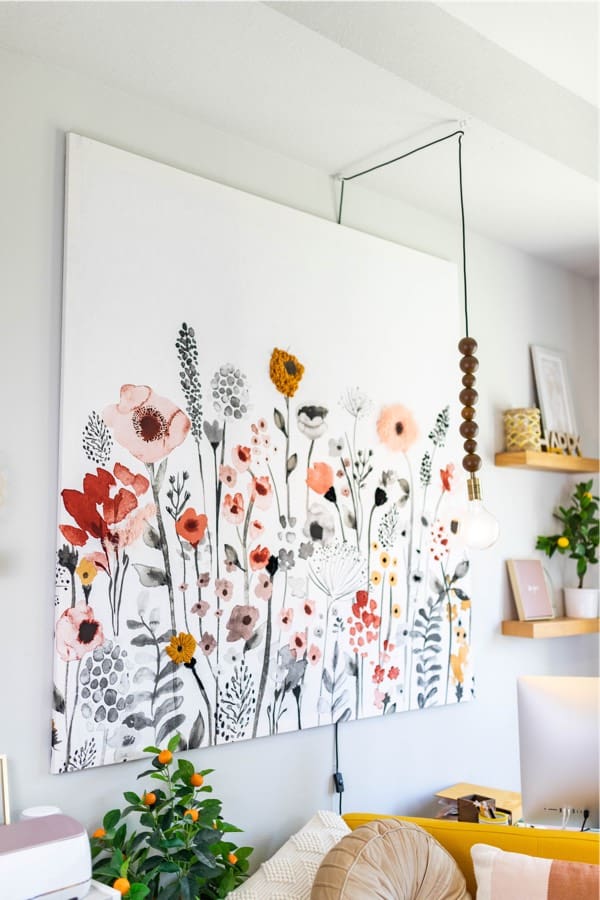
Canvas And Paints
Canvas is a classic choice for wall art. It holds paint well and shows colors clearly. Acrylic and watercolor paints work great on canvas. You can create abstract patterns or detailed pictures. Paints dry fast and come in many colors. Canvas boards and stretched canvases suit different budgets and spaces.
Paper And Cardstock
Paper and cardstock are affordable and versatile. Use colored paper or plain sheets to draw or paint on. Cut shapes or layer pieces to add texture. Cardstock is thicker and holds paint or glue better than regular paper. This material works well for collage art and paper crafts. You can also frame your paper art easily.
Recycled Materials
Recycled materials add a unique touch to wall art. Old magazines, newspapers, and cardboard can become art supplies. Use scraps to create mosaics or mixed media pieces. Bottle caps, fabric scraps, and buttons also work well. Recycling saves money and helps the environment. It lets you experiment with textures and colors.
Fabric And Textiles
Fabric and textiles bring softness and warmth to wall art. Use scraps, old clothes, or fabric swatches for your projects. Sew or glue pieces onto a base like canvas or wood. Embroidery and quilting create interesting patterns. Textiles add depth and color to your designs. They can match your room’s décor perfectly.
Techniques For Diy Wall Art
Creating your own wall art brings a personal touch to any space. Different techniques offer many ways to express creativity. These methods use simple tools and materials. They allow you to craft unique pieces that match your style and home decor.
Stencil And Spray Paint
Stencil and spray paint make bold, clear designs easy. Choose a stencil with shapes or patterns you like. Place it on the wall or canvas. Spray paint over it carefully. Lift the stencil to reveal the design. This method works well for repeating patterns or quotes.
Decoupage And Collage
Decoupage involves gluing paper pieces to a surface. Use magazines, old books, or decorative papers. Cut out shapes or images you want. Arrange them on canvas or wood. Apply glue over the paper to seal it. Collage lets you layer different textures and colors. It creates a rich, artistic effect.
String Art
String art uses nails and thread to form images. Hammer small nails into a wooden board in a pattern. Wrap colorful string or yarn around the nails. Follow the shape or design you want. This technique produces a 3D effect. It is simple but eye-catching.
Mixed Media
Mixed media combines various materials in one artwork. You can use paint, fabric, paper, and objects together. Layer these elements for depth and interest. This technique encourages experimentation. It lets you create something truly unique and textured.
Creative Project Ideas
Creative project ideas bring life to plain walls. They turn empty spaces into personal art. These projects are fun and simple to make. Each idea adds a unique touch to your home. Choose a style that fits your taste and skills. Start your DIY wall art adventure with these ideas.
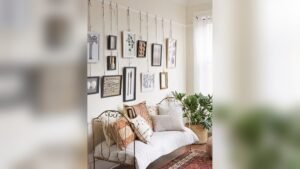
Gallery Wall Arrangements
Create a gallery wall by grouping frames of different sizes. Mix photos, prints, and drawings for variety. Arrange frames in a balanced way on the floor first. Use paper cutouts on the wall to plan placement. This method helps avoid mistakes and holes.
Choose frames with similar colors for a unified look. Or pick different styles for an eclectic feel. Personalize your gallery with your favorite memories and art. It’s a great way to tell your story visually.
3d Wall Sculptures
3D wall sculptures add depth and texture to your space. Use materials like wood, paper, or metal to create shapes. Fold paper to make geometric designs or flowers. Paint wooden pieces to match your room colors. Attach sculptures with strong adhesive or hooks.
These projects need a little more effort but look impressive. They catch light and shadow, creating an eye-catching effect. Perfect for modern or minimalist rooms that need character.
Photo Wall Displays
Photo wall displays highlight your favorite moments and people. Use string lights and clips to hang photos easily. Change pictures often to keep the display fresh. Arrange photos in rows or a heart shape for charm.
Try black and white photos for a classic look. Colorful images add vibrancy and fun. This project is budget-friendly and quick to update anytime.
Wall Tapestries
Wall tapestries bring warmth and softness to any room. Choose patterns or scenes that reflect your style. Hang tapestries with rods, nails, or adhesive strips. They cover large areas and hide wall imperfections.
Fabric tapestries also improve room acoustics by softening sound. Wash or replace them easily to change the room’s mood. Great for bedrooms, living rooms, or cozy reading corners.
Tips For Personalizing Your Art
Personalizing your wall art makes your space truly yours. It reflects your style and memories. Small touches create big impact. Use simple ideas to make your art stand out and feel special.
Incorporating Family Memories
Use photos from family events or trips. Print them in black and white for a classic look. Add hand-written notes or dates for a personal touch. Create a collage with your favorite moments. This turns your wall into a storybook of your life.
Matching Color Schemes
Pick colors that match your room’s style. Use shades that blend well with furniture and walls. Choose two or three main colors for harmony. Paint or frame your art in these colors. This keeps your space balanced and pleasing to the eye.
Scaling For Different Spaces
Measure your wall before starting. Large walls need big pieces or groups of art. Small spaces work best with small or medium art. Arrange art in patterns that fit the wall shape. This prevents the space from feeling crowded or empty.
Adding Texture And Layers
Mix materials like fabric, paper, and paint. Add 3D elements like buttons or beads. Layer pieces to create depth and interest. Use textured frames or canvases for variety. Texture makes your art feel alive and unique.
:max_bytes(150000):strip_icc()/makinghomebase-3e42055a927440a3be7cff5c75f6fb39.jpg)
Credit: www.thespruce.com
Tools And Supplies Checklist
Creating your own wall art is fun and rewarding. Before starting, gather the right tools and supplies. This checklist helps prepare you for a smooth project. It covers everything from basic art supplies to safety gear. Proper storage ideas keep your workspace neat and tidy.
Basic Art Supplies
Start with essentials like paint, brushes, and canvas. Include pencils and erasers for sketching designs. Colored markers and pastels add variety. Paper or wood panels work well for different styles. Glue and scissors help with collage or mixed media.
Specialty Tools
For unique effects, add stencil sets and sponges. Palette knives create texture and layers. A ruler and cutting mat improve precision. Heat guns dry paint faster and aid embossing. Craft knives allow detailed cutting on paper or thin wood.
Safety Equipment
Protect your hands with gloves during messy tasks. Use masks when working with sprays or powders. Keep goggles handy for eye protection. Ventilate your workspace to avoid harmful fumes. First aid kit nearby ensures quick care if needed.
Storage And Organization
Use containers to separate paints and brushes. Label boxes for easy access to supplies. Shelves keep larger items off the floor. Drying racks help artworks dry safely. A tidy space boosts creativity and saves time.
Displaying And Maintaining Your Art
Displaying your DIY wall art correctly makes your space feel warm and personal. Proper care keeps your art fresh and vibrant for years. Small steps can protect your work and make it stand out. This guide helps you hang, light, clean, and change your art with ease.
Hanging Techniques
Choose the right wall spot with good visibility. Use nails, hooks, or adhesive strips for support. Measure carefully to keep art level and centered. Group smaller pieces for a gallery wall look. Secure heavy frames with wall anchors for safety.
Lighting Your Artwork
Use soft, focused lights to highlight your art. Avoid direct sunlight to prevent colors from fading. LED lights work well and produce little heat. Position lamps or spotlights to reduce glare and shadows. Lighting adds depth and draws attention to details.
Cleaning And Care Tips
Dust your art gently using a soft cloth or brush. Avoid harsh chemicals that can damage paint or paper. For glass frames, use a mild glass cleaner sprayed on a cloth. Check for signs of wear like fading or moisture spots. Handle art with clean, dry hands to prevent stains.
Rotating And Updating Displays
Change your wall art seasonally to refresh your space. Store unused pieces in a cool, dry place with protective wrapping. Swap colors and themes to match your mood or room decor. Regular updates keep your walls interesting and lively. Rotation also helps preserve your favorite pieces longer.
Credit: www.crazylaura.com
Frequently Asked Questions
What Are Easy Diy Wall Art Ideas For Beginners?
Simple projects like canvas painting, paper collages, and fabric art are great for beginners. These require minimal tools and materials, making them easy to start. They allow creativity without overwhelming complexity, perfect for anyone new to DIY wall decor.
How To Choose Materials For Diy Wall Art?
Select materials based on your wall space, style, and durability needs. Common options include canvas, wood, paper, and fabric. Choose eco-friendly or recycled materials for sustainability. Always consider the ease of handling and your skill level.
Can Diy Wall Art Improve Home Decor Style?
Yes, DIY wall art adds a personal touch and unique character to any room. It allows customization to match your style and color scheme. Handmade art can also be a conversation starter and enhance the overall ambiance.
What Tools Are Essential For Diy Wall Art Projects?
Basic tools include scissors, glue, paintbrushes, and a ruler. Depending on the project, you might need a hot glue gun or stencils. Keeping tools organized and accessible speeds up your creative process.
Conclusion
Creating your own wall art adds a personal touch to any room. It saves money and lets you show your style. Simple tools and materials bring your ideas to life. Experiment with colors, shapes, and textures for unique results. This DIY approach makes decorating fun and rewarding.
Start small and build confidence with each project. Your walls will tell a story only you can share. Give it a try and enjoy the creative process!
As an Amazon Associate, I earn from qualifying purchases.