Have you ever looked at your favorite table lamp and noticed it flickering or not working at all? Instead of tossing it away or buying a new one, what if you could bring it back to life yourself?
Rewiring a table lamp is easier than you might think, and you don’t need to be an expert to do it. Imagine the satisfaction of fixing your lamp with your own hands while saving money and adding a personal touch to your space.
In this guide, you’ll discover simple, step-by-step instructions to safely rewire your table lamp and make it shine bright again. Ready to get started? Let’s dive in!
Credit: arloren.com
Tools And Materials Needed
Rewiring a table lamp is a simple task with the right tools and materials. Gathering everything before starting saves time and helps avoid mistakes. Using the correct tools keeps the process safe and smooth. Below is a list of what you need for this project.
Tools Required
- Wire strippers – to remove the insulation from wires safely
- Screwdriver – to open the lamp base and secure parts
- Utility knife – for cutting old wires and insulation
- Needle-nose pliers – to bend and twist wires easily
- Multimeter – to check electrical connections and safety
Materials Needed
- Replacement lamp cord with plug – the correct length and rating
- New socket – if the old one is damaged or worn
- Wire nuts or electrical tape – to secure wire connections
- Heat shrink tubing – for extra insulation and protection
- Electrical grease (optional) – to prevent corrosion inside the socket
Safety Tips Before You Start
Before you start rewiring a table lamp, safety must be your top priority. Working with electrical parts can be risky without the right precautions. Taking simple safety steps protects you from shocks, burns, and damage to the lamp.
Read each safety tip carefully. Prepare your workspace and tools well. This will help you finish the task smoothly and safely.
Turn Off And Unplug The Lamp
Always unplug the lamp from the power outlet before starting. Double-check that no electricity flows to the lamp. This step prevents electric shock during rewiring.
Use Insulated Tools
Choose tools with insulated handles to avoid electric shocks. Regular tools might conduct electricity and cause injuries. Insulated tools keep you safe while working on wires.
Work In A Dry Area
Keep your workspace dry and free of liquids. Water conducts electricity and raises the risk of shocks. A dry area ensures safer handling of electrical parts.
Wear Safety Gear
Wear safety gloves and glasses for extra protection. Gloves stop electric shocks and cuts. Glasses protect your eyes from wire pieces or sparks.
Check The Lamp’s Condition
Inspect the lamp for damage before rewiring. Look for frayed wires, cracked sockets, or loose parts. Fixing these problems first prevents further hazards.
Removing The Old Cord
Removing the old cord is the first step in rewiring a table lamp. It helps prepare the lamp for a new, safe cord. This process needs care to avoid damage to the lamp parts. The old cord may be worn out or unsafe, so removing it is important.
Turn off the lamp and unplug it before starting. Safety is the top priority. Prepare a clean workspace with good lighting. Keep tools handy, like a screwdriver and pliers. Follow these simple steps to remove the old cord easily.
Unplug And Disassemble The Lamp Base
Always unplug the lamp first. Find the screws or clips holding the base together. Use a screwdriver to remove them carefully. Separate the base parts to access the lamp’s wiring. Keep screws safe for reassembly later.
Locate And Loosen The Cord Connections
Look for where the cord connects inside the lamp. Usually, it connects to the socket or terminal screws. Use a screwdriver or pliers to loosen these connections. Take care not to damage the socket or wires.
Remove The Old Cord From The Lamp
Pull the cord gently through the lamp’s body. It may be tight or stuck in some places. Wiggle it slowly to avoid breaking the lamp parts. Once free, discard the old cord safely.

Credit: www.youtube.com
Inspecting The Lamp Components
Before rewiring a table lamp, inspecting its parts is essential. This step helps find problems and ensures safety. Careful checks prevent mistakes during the rewiring process. Understanding each component makes the task easier and safer.
Identify The Power Cord And Plug
Start by looking at the power cord. Check if it is cracked or frayed. A damaged cord needs replacement. Next, examine the plug. Make sure the prongs are straight and clean. A faulty plug can cause shocks or fire.
Examine The Socket And Switch
Look closely at the socket where the bulb fits. It should be clean and free of rust. Test the switch to see if it works smoothly. A broken switch must be replaced for the lamp to function properly.
Check The Lamp Harp And Base
Inspect the lamp harp, the frame that holds the shade. It should be sturdy and not bent. The base must be stable and free of cracks. A loose base can cause the lamp to tip over easily.
Assess The Wiring Inside
Carefully open the lamp to see the wires inside. Check for loose connections or worn insulation. Old wires may need full replacement. Proper wiring ensures the lamp works safely and well.
Choosing The Right Replacement Cord
Choosing the right replacement cord is key when rewiring a table lamp. The cord must fit the lamp’s design and meet safety rules. Picking the wrong cord can cause electric shocks or fires.
Focus on the cord’s thickness, length, and type. These factors affect how well the lamp works and lasts. Use a cord that matches the lamp’s power needs and style.
Choosing The Correct Cord Thickness
The thickness of the cord is called the gauge. A lower gauge number means a thicker wire. Thicker wires carry more electricity safely. Check the lamp’s wattage to pick the right gauge.
Selecting The Proper Cord Length
Use a cord long enough to reach your outlet comfortably. Too short is unsafe and limits lamp placement. Too long can create extra tangles and mess. Measure the space before buying the cord.
Picking The Right Cord Type
There are many cord types for lamps. Some have a cloth cover, others plastic. Choose a cord that matches the lamp’s look and use. Make sure it is rated for indoor use and safe for lamps.
Step-by-step Rewiring Process
Rewiring a table lamp is a simple task that anyone can do at home. It helps make the lamp safe and functional again. Follow these clear steps to rewire your lamp quickly and correctly.
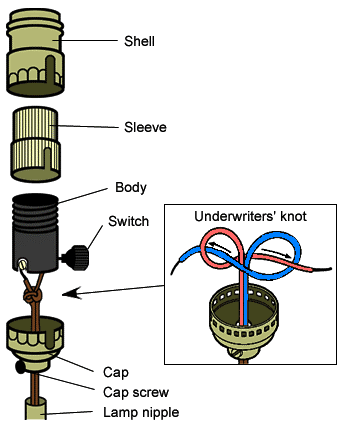
Detaching The Socket
First, unplug the lamp from the power source. Remove the lampshade and bulb carefully. Find the socket where the bulb screws in. Unscrew the socket shell to expose the wires inside. Note how the wires connect to the socket for later.
Connecting The New Cord
Cut the new cord to the needed length. Strip about half an inch of insulation from each wire end. Attach the wires to the correct terminals on the socket. Usually, the ribbed wire goes to the neutral terminal. Tighten the screws to hold the wires firmly.
Securing The Wiring
Check that no bare wires are showing outside the terminals. Use electrical tape to cover any exposed wire parts. Make sure the wires are not loose or twisted. Keep the wires inside the lamp base neatly arranged. This prevents shorts or damage later.
Reassembling The Lamp
Put the socket shell back in place and tighten it. Screw in the light bulb. Replace the lampshade carefully. Plug in the lamp and test it. The lamp should light up safely and work as before.
Testing The Rewired Lamp
Testing the rewired lamp is a key step to ensure safety and function. It checks if the wiring was done correctly and the lamp works well. Before plugging it in, always inspect your work carefully. This avoids any risks of short circuits or shocks.
Testing also helps find any loose connections or faults early. It saves time and prevents damage to the lamp or your home. You need a calm space and good light for this task. Follow each step slowly and carefully.
Visual Inspection Of Wiring
Look closely at all wires and connections inside the lamp. Check if wires are tightly connected to terminals. Make sure no copper wire is exposed outside the connectors. Confirm the insulation is intact and not damaged. Fix any loose or frayed wires before moving on.
Using A Multimeter For Continuity
Set your multimeter to the continuity test mode. Touch the probes to the ends of each wire to check connection. A beep or low resistance means the wire is good. No sound or infinite resistance shows a break in wiring. Repeat this for all wires and connections inside the lamp.
Plugging In And Turning On
Plug the lamp into a socket with the switch off. Turn the switch on slowly and watch for any sparks or smoke. The bulb should light up steadily without flickering. If the lamp does not turn on, unplug it immediately. Recheck the wiring and bulb before trying again.

Credit: www.youtube.com
Troubleshooting Common Issues
Troubleshooting common problems helps you fix your table lamp fast. Knowing what to check saves time and avoids frustration. Many issues arise from simple wiring mistakes or loose connections. You can solve most problems with basic tools and a careful eye.
Checking For Loose Connections
Loose wires often cause lamps to stop working. Look inside the lamp base and socket. Make sure all wires are tight and secure. Wiggle wires gently to see if the light flickers. Tighten any loose screws or wire nuts carefully. This can restore power flow immediately.
Testing The Switch Functionality
A faulty switch may block electricity from reaching the bulb. Turn the switch on and off several times. Listen for a clicking sound or feel resistance. Use a multimeter to check switch continuity if needed. Replace the switch if it shows no continuity. This step ensures the lamp turns on properly.
Inspecting The Power Cord
Damaged cords cause electrical shorts or no power. Examine the cord for cracks, cuts, or frays. Check both ends for secure connections. Avoid using lamps with exposed wires to prevent shocks. Replace any damaged cords with proper replacements. This keeps your lamp safe and working well.
Verifying Bulb And Socket Condition
The bulb or socket might be the problem. Try a new bulb to see if the lamp lights up. Inspect the socket for corrosion or dirt. Clean the socket gently with a dry cloth. Replace the socket if it looks damaged. This ensures good contact and bright light.
When To Seek Professional Help
Rewiring a table lamp can be a simple task. But some situations need a pro’s touch. Knowing when to seek professional help keeps you safe and your lamp working well.
Electrical work can be risky. Mistakes might cause shocks or fires. A professional has the right tools and skills to handle tricky parts.
Signs Of Complex Electrical Issues
Burn marks or melted parts show serious problems. Sparks or flickering lights mean bad wiring. Professionals can fix these safely and correctly.
Unfamiliar Or Old Wiring Systems
Old lamps may have outdated wires. These wires break easily or fail safety tests. Experts know how to update old wiring to meet safety rules.
Unsure About Electrical Codes
Electrical codes keep your home safe. A pro understands local rules. They make sure your lamp wiring follows these laws.
Lack Of Tools Or Experience
Proper tools are needed for safe rewiring. Without them, mistakes are likely. Professionals have everything needed and know how to use it.
Desire For A Quality Finish
A professional gives a neat and secure result. Your lamp will work well and look good. This adds value and safety to your home.
Frequently Asked Questions
How Do You Safely Rewire A Table Lamp?
To safely rewire a table lamp, unplug it first. Remove the old cord carefully. Connect the new cord wires to the socket terminals. Secure connections tightly. Test the lamp before reassembling. Always follow electrical safety guidelines.
What Tools Are Needed To Rewire A Table Lamp?
You need a screwdriver, wire strippers, new lamp cord, electrical tape, and pliers. These tools help remove old wiring and attach new wires properly for safe operation.
How Long Does It Take To Rewire A Table Lamp?
Rewiring a table lamp typically takes 20 to 40 minutes. Time depends on your experience and lamp complexity. Taking your time ensures safety and proper wiring.
Can I Use Any Lamp Cord To Rewire My Table Lamp?
Use a lamp cord rated for the lamp’s voltage and current. Avoid cheap or damaged cords. Using proper cord ensures safety and longevity of your lamp.
Conclusion
Rewiring a table lamp can save money and bring new life to old lamps. Safety matters most—always unplug before starting. Take your time with each step. Double-check connections to avoid problems later. A well-wired lamp shines brighter and works longer.
You can enjoy a safer, brighter home with simple tools and care. Give your lamp a fresh start today.
As an Amazon Associate, I earn from qualifying purchases.