
Is your floor lamp flickering, or has the cord become unsafe to use? You don’t have to toss it out or pay a high electrician’s bill.
Rewiring a floor lamp is easier than you think, and you can do it yourself with just a few tools. Imagine saving money and giving new life to your favorite lamp. In this guide, you’ll learn simple steps to safely rewire your floor lamp, even if you have little experience.
Keep reading, and by the end, you’ll feel confident to fix your lamp and brighten up your space once again.

Credit: www.thisoldhouse.com
Tools And Materials Needed
Before you start rewiring a floor lamp, gather the right tools and materials. Having everything ready makes the process smooth and safe. The right tools help you work faster and avoid mistakes. Materials like wire and sockets must fit your lamp type. Safety gear protects you from shocks and injuries. This section covers what you need for a successful lamp rewire.
Essential Tools
Basic tools make rewiring easier. You need a screwdriver to open lamp parts. Wire strippers remove insulation without cutting wire. Needle-nose pliers help twist wires and hold small parts. A voltage tester checks if power is off. Scissors or a utility knife cut wires carefully. A multimeter can check connections and voltage.
Choosing The Right Wire
Use wire that matches your lamp’s power needs. Most lamps use 18 or 16 gauge wire. Copper wire is common and works well. Make sure the wire has good insulation. It must handle the lamp’s wattage safely. Avoid thin or worn wires to prevent fires. Buy wire sold for electrical use, not craft wire.
Safety Gear
Safety gear keeps you safe from electric shocks and cuts. Wear rubber gloves to protect your hands. Safety glasses stop metal bits from hurting your eyes. Work in a dry area to avoid accidents. Unplug the lamp before starting any work. Keep a fire extinguisher nearby for extra safety.

Credit: www.sunmory.com
Preparing The Lamp
Preparing the lamp is the first step in rewiring a floor lamp. It helps ensure safety and makes the process smoother. This stage involves unplugging, taking the lamp apart, and removing old wires.
Careful preparation saves time and avoids damage to the lamp or yourself. Follow each step clearly to keep everything organized.
Unplugging And Disassembling
Always unplug the lamp before starting any work. This stops electric shocks and keeps you safe.
Remove the lampshade, bulb, and any other parts covering the wiring. Use a screwdriver if needed to open the base or socket area. Keep small pieces safe for later.
Removing The Old Wiring
Locate the wires inside the lamp. They usually run from the plug up to the socket.
Use a wire cutter to carefully cut the old wires. Gently pull them out from the lamp frame. Avoid breaking any parts during this step.
Check if any wire ends are connected to screws or clips. Loosen these connections to free the wires completely.
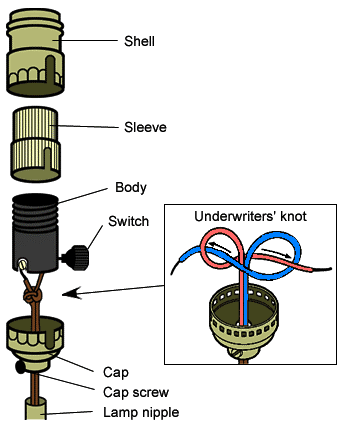
Wiring The Lamp
Wiring the lamp is a key step in rewiring a floor lamp. It ensures the lamp works safely and correctly. Careful wiring helps avoid electrical problems and keeps the lamp stable.
Follow each step carefully to make a good connection. Use the right tools and take your time. This part is not hard but needs focus.
Stripping The Wire Ends
First, strip the wire ends to expose the copper inside. Use wire strippers to remove about half an inch of the outer insulation. Be gentle to avoid cutting the wire strands. Clean copper wire makes a strong electrical connection.
Connecting The Wires
Match the wires by color: usually black to black and white to white. Twist the exposed copper ends together tightly. This ensures a solid connection and good electricity flow. Avoid loose wires, as they can cause sparks or shorts.
Securing The Connections
Use wire nuts to cover the twisted wires. Turn the nuts clockwise until tight. Check that no bare wire is showing. Wrap connections with electrical tape for extra safety. This keeps wires from moving or touching metal parts inside the lamp.
Reassembling The Lamp
Reassembling the lamp is the final step after rewiring. Take your time to fit all parts correctly. A careful reassembly ensures the lamp works safely and looks good. Follow each step patiently to avoid mistakes.
Putting The Parts Back Together
Start by placing the socket back onto the lamp stem. Tighten any screws or nuts to hold it firmly. Next, slide the lamp shade onto the harp or holder. Make sure it fits snugly without wobbling. Finally, reattach the base to the lamp stem. Check all connections for stability before moving on.
Testing The Lamp
Plug the lamp into a power source carefully. Turn the switch on and watch for light. If the bulb lights up, your rewiring was successful. If not, unplug the lamp and check the wiring again. Never touch wires when the lamp is plugged in. Safety first to avoid shocks or damage.
Safety Tips For Diy Electrical Repairs
Working on electrical repairs at home can save money and time. Safety must be the top priority during these projects. Simple mistakes can cause shocks or fires. Follow clear safety rules to protect yourself and your home.
Avoiding Common Mistakes
Turn off the power before starting any repair. Use a voltage tester to confirm no electricity flows. Always handle wires carefully to avoid cuts or sparks. Use wire connectors to join wires, never twist them bare. Check the lamp cord for damage before rewiring. Replace old or frayed cords to prevent hazards. Don’t rush; take your time to do each step right.
When To Call A Professional
Call an electrician if you feel unsure about any step. Complex wiring or damaged sockets need expert care. If your lamp has unusual wiring or multiple switches, get help. When you can’t identify the power source, stop and call a pro. Safety is more important than saving money on repairs. Professionals have tools and training to fix problems safely.
Credit: arloren.com
Frequently Asked Questions
How Do I Safely Rewire A Floor Lamp?
Turn off and unplug the lamp first. Remove the lampshade and bulb. Use insulated tools and follow wiring instructions carefully to avoid electric shock.
What Materials Do I Need To Rewire A Floor Lamp?
You need new lamp cord, wire strippers, screwdrivers, electrical tape, and a replacement socket if necessary. Always use materials rated for lamp wiring.
How Long Does It Take To Rewire A Floor Lamp?
Rewiring typically takes 30 to 60 minutes depending on your skill level and lamp complexity. Take your time to ensure safety and accuracy.
Can I Rewire A Floor Lamp Without Professional Help?
Yes, if you follow instructions carefully and take safety precautions. However, consult a professional if unsure about electrical work to avoid hazards.
Conclusion
Rewiring a floor lamp can save you money and give it new life. Take your time and follow each step carefully. Always make sure the lamp is unplugged before starting. Use the right tools and parts for safety. With patience, you can fix the wiring yourself.
Enjoy your lamp working like new again. Small projects like this build your confidence and skills. Keep practicing, and soon you’ll handle more repairs easily.
As an Amazon Associate, I earn from qualifying purchases.