Are you ready to add a personal touch to your home décor? Learning how to make throw pillows is easier than you think, and it lets you create cozy, stylish accents that fit your unique style perfectly.
Imagine sinking into a soft pillow that you designed yourself—comfort and creativity combined. In this guide, you’ll discover simple steps and helpful tips that make the process fun and rewarding. Keep reading, and soon you’ll have beautiful, custom throw pillows that bring warmth and personality to any room.

Credit: www.youtube.com
Choosing Fabric
Choosing the right fabric is key to making beautiful throw pillows. The fabric affects how the pillow looks and feels. It also impacts how long your pillow will last. Picking the best fabric can make your DIY pillow stand out. Think about where you will use the pillow. Soft fabrics work well for indoor pillows. Durable fabrics suit outdoor or high-use pillows.
Best Materials For Throw Pillows
Cotton is a popular choice for throw pillows. It is soft, easy to clean, and breathable. Linen offers a natural look with a nice texture. It is strong and gets softer with use. Velvet feels luxurious and adds warmth to any room. It works well for decorative pillows. For outdoor pillows, choose fabrics like acrylic or polyester. These resist water and fading from sunlight. Canvas is tough and easy to clean, perfect for everyday use.
Mixing Patterns And Textures
Mixing different fabrics can create a stylish pillow display. Pair smooth fabrics with rough textures for contrast. For example, mix velvet with burlap or linen. Use patterns to add interest and personality. Stripes, florals, or geometric shapes work well together. Stick to a color scheme to keep the look balanced. Mixing textures and patterns adds depth and charm. It makes your throw pillows more inviting and unique.
Basic Sewing Tools
Basic sewing tools are the foundation for making beautiful throw pillows. These tools help you cut, stitch, and shape fabric with ease. Having the right supplies makes sewing faster and more fun. Start with simple tools and add more as you gain confidence.
Essential Supplies
Scissors are a must. Sharp fabric scissors cut clean edges. Needles come next. Hand sewing needles or machine needles work well. Thread matches your fabric color. Pins hold fabric pieces together before sewing. A measuring tape helps with accurate cuts. A seam ripper fixes mistakes quickly. Finally, a sewing machine speeds up the process.
Optional Accessories For Detail
Marking tools like fabric chalk guide your stitches. A rotary cutter and cutting mat give straight edges. Bias tape makers add neat edges and trims. Decorative threads enhance pillow designs. Button covers and zippers add style and function. These extras bring creativity and polish to your throw pillows.
Simple Pillow Shapes
Simple pillow shapes make sewing throw pillows easy and fun. These shapes suit most rooms and styles. They work well for beginners. You can focus on fabric and colors instead of complex cuts. Start with basic shapes to get comfortable with the process.
Square Pillows
Square pillows are the most common shape. They have equal sides, usually 16 to 20 inches long. This shape fits well on sofas and beds. Sewing a square pillow requires just four straight seams. You can easily add zippers or buttons for closure. Square pillows let you play with patterns and textures.
Rectangle And Round Options
Rectangle pillows offer a different look. They are longer and narrower than square ones. Rectangles work well as lumbar pillows for back support. Round pillows add softness and style. They are perfect for corners or chairs. Both shapes need simple sewing steps. Choose rectangles or rounds to change your pillow’s look without much effort.

Credit: vidscola.com
Cutting And Measuring
Cutting and measuring are the first important steps in making throw pillows. These steps ensure your pillow covers fit perfectly and look neat. Taking time to measure and cut accurately saves fabric and avoids mistakes.
Careful measuring helps you get the right size. Precise cutting creates clean edges and makes sewing easier. Both steps set a strong base for the rest of your project.
Accurate Measurements
Use a clear ruler or measuring tape for accuracy. Measure twice to avoid errors. Add extra fabric for seams, usually about half an inch on each side. Check your pillow form size before measuring fabric. Note down measurements to keep track. Straight lines help keep pieces even and balanced. Accuracy at this stage means better final results.
Tips For Cutting Fabric
Lay fabric flat on a clean surface. Use sharp fabric scissors for smooth cuts. Cut slowly along your measured lines to stay precise. Pin the fabric layers together to avoid shifting. Avoid lifting fabric while cutting; keep it steady. Cut pieces in pairs if making a front and back. Proper cutting saves time during sewing and improves pillow shape.
Sewing Techniques
Sewing techniques are key to making beautiful throw pillows. They help you join fabric pieces neatly and securely. Good sewing makes pillows last longer and look great. This section covers basic hand sewing and using a sewing machine. Both methods have their benefits.
Hand Sewing Basics
Hand sewing is simple and does not need special tools. Start with a needle and thread that match your fabric color. Use small, even stitches to join fabric edges. A running stitch or backstitch works well for seams. Keep stitches tight but not too tight to avoid puckering. Hand sewing allows more control for small or tricky areas. It is perfect for closing the pillow after stuffing. Use pins to hold fabric pieces before sewing.
Using A Sewing Machine
A sewing machine speeds up pillow making and creates strong seams. Choose a straight stitch for most pillow seams. Set the stitch length to medium for durability. Place fabric pieces right sides together before sewing. Guide fabric gently to keep seams straight. Backstitch at the start and end to secure stitches. Sewing machines work best for larger projects and thick fabrics. Practice on scrap fabric to get comfortable with your machine.
Credit: www.itsalwaysautumn.com
Adding Closures
Adding closures to throw pillows lets you remove and wash the covers. This keeps the pillows fresh and clean for a long time. Closures also help you change the pillow look quickly. Choose a closure that fits your sewing skills and style.
Zippers And Buttons
Zippers are a popular choice for throw pillow closures. They offer a neat, hidden finish. Sew the zipper along one edge of the pillow cover. This makes it easy to insert and remove the pillow form. Use a zipper foot on your sewing machine for a smooth finish.
Buttons add a charming touch to pillows. Sew buttonholes or loops on one side of the cover. Attach matching buttons on the other side. You can use large or small buttons depending on your design. Buttons give a cozy, handmade feel to your pillows.
Envelope Style Covers
Envelope style covers do not require zippers or buttons. The back of the cover overlaps like an envelope. This overlap holds the pillow form inside securely. Sew two pieces of fabric with an opening at the back. This style is simple to make and easy to clean.
Envelope covers offer a relaxed and casual look. They are perfect for beginners and quick projects. Choose sturdy fabric to keep the pillow form from slipping out.
Stuffing Pillows
Stuffing pillows is a key step in making cozy and attractive throw pillows. The right stuffing affects comfort and shape. It also impacts how the pillow looks on your couch or bed. Choosing the correct filling and stuffing evenly ensures a smooth, plump pillow.
Choosing The Right Filling
Select filling based on pillow use. Polyester fiberfill is soft, affordable, and easy to find. It holds shape well and feels light. Foam pieces add firmness and support. Feathers give a natural, fluffy feel but require more care. Cotton stuffing is breathable and firm but can flatten fast. Think about comfort and durability.
Evenly Distributing Stuffing
Start by adding small amounts of filling. Push stuffing into corners and edges first. Avoid lumps by spreading filling evenly inside. Use your hands to shape and smooth the pillow. Check for gaps or tight spots. Add more filling if the pillow feels flat. Even stuffing keeps the pillow soft and full for a long time.
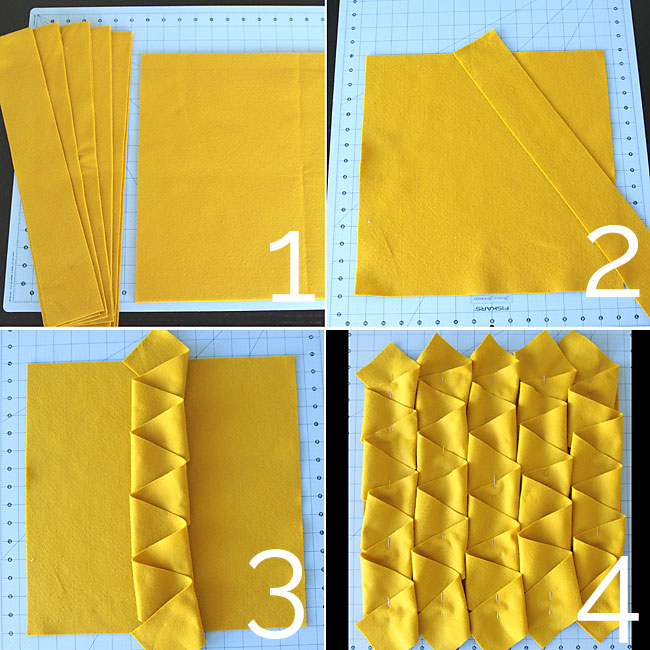
Creative Embellishments
Creative embellishments make throw pillows stand out. They add personality and charm to plain fabric. Small touches can change the look and feel of your pillow. Choose embellishments that match your style and room decor. This section shows easy ways to decorate your pillows with simple tools.
Appliques And Patches
Appliques and patches bring texture and color to your pillows. Cut shapes or designs from fabric scraps. Sew or glue them onto the pillow cover. Flowers, stars, or geometric shapes work well. Use contrasting colors for a bold look. Make sure to secure edges to avoid fraying. This method adds a handmade, cozy feel to your pillows.
Using Fabric Paint And Stencils
Fabric paint and stencils create neat, creative patterns. Choose stencils with designs you like. Place the stencil on the pillow fabric carefully. Dab fabric paint over the stencil using a sponge or brush. Let the paint dry completely before using the pillow. This technique allows for repeated designs and custom colors. It’s a simple way to personalize your throw pillows.
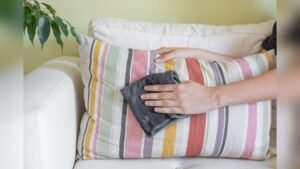
Care And Maintenance
Taking care of your throw pillows helps them look fresh and last longer. Proper care keeps the fabric clean and the stuffing soft. Follow simple steps to maintain their beauty and comfort.
Washing Tips
Check the pillow’s label for washing instructions. Use a gentle cycle with cold water to avoid damage. Mild detergent works best to keep colors bright. Remove the pillow cover if it is removable. Air dry covers and pillows completely before use. Avoid bleach or harsh chemicals that weaken fabric.
Keeping Pillows Fluffy
Fluff pillows daily to keep them full and soft. Shake and squeeze the pillow gently to redistribute filling. Use a clean dryer sheet or tennis ball in the dryer. This helps restore puffiness without harming the pillow. Store pillows in a dry place away from direct sunlight to prevent fading and moisture buildup.
Frequently Asked Questions
What Materials Do I Need To Make Throw Pillows?
To make throw pillows, gather fabric, pillow inserts, sewing thread, scissors, pins, and a sewing machine. Choose fabric based on your style and durability needs. These basic materials ensure a successful DIY pillow project with professional-looking results.
How Do I Choose The Right Fabric For Throw Pillows?
Select fabric that matches your decor and is durable. Cotton, linen, and velvet are popular choices. Consider texture, color, and ease of cleaning. Durable fabrics work best for frequently used pillows, while decorative fabrics suit accent pieces.
What Is The Easiest Sewing Method For Beginners?
The envelope closure method is simplest for beginners. It avoids zippers and buttons, allowing easy removal for washing. Simply sew three sides and overlap fabric on the fourth side. This technique creates a neat, functional pillow cover.
How Do I Keep Pillow Inserts From Shifting Inside Covers?
Use pillow inserts that fit snugly inside covers. Add fabric glue dots or sew a few stitches inside to hold the insert in place. This prevents shifting and keeps pillows looking full and well-shaped.
Conclusion
Making throw pillows is simple and fun. You can choose colors and fabrics you like. Sewing them yourself saves money and adds a personal touch. These pillows can brighten any room quickly. Try different shapes and sizes for variety. Enjoy the comfort and style your handmade pillows bring.
Keep practicing to improve your skills each time. Creating your own throw pillows is a great way to decorate. Give it a try and see the results yourself.
As an Amazon Associate, I earn from qualifying purchases.