Looking to add a unique touch to your living space without spending a fortune? A DIY side table is the perfect project for you.
It’s simple, fun, and lets you create something that fits your style perfectly. Imagine having a piece that not only looks great but also gives you the pride of making it yourself. You’ll discover easy steps and tips to build your own side table, even if you’ve never done a project like this before.
Ready to turn your ideas into reality? Let’s get started!
Choosing The Right Materials
Choosing the right materials is key to building a sturdy and attractive side table. The materials affect the table’s look, strength, and how long it lasts. Picking good materials makes your project easier and more fun. It also helps you create a table that fits your style and needs.
Wood Types And Finishes
Wood is the most popular material for DIY side tables. Pine is soft and easy to cut. Oak is hard and very strong. Maple offers a smooth surface and is good for painting. Each wood type has its own color and grain pattern. Consider the room’s style and your budget when choosing wood.
Finishes protect wood and add beauty. Clear varnish keeps the natural look. Stains change the wood’s color but show the grain. Paint covers the wood completely and adds color. Choose a finish that fits your style and use. For a table that will get wet, pick a waterproof finish.
Tools And Supplies Needed
Gathering the right tools makes your work easier. A saw cuts wood pieces to size. Sandpaper smooths rough edges and surfaces. A drill helps put screws in place. Screws or nails hold the table parts together. Wood glue adds extra strength to joints.
Other helpful supplies include a tape measure for exact sizes and clamps to hold pieces while glue dries. A paintbrush or cloth applies finishes evenly. Safety gear like goggles and gloves protects you. Having all tools ready avoids delays and mistakes.
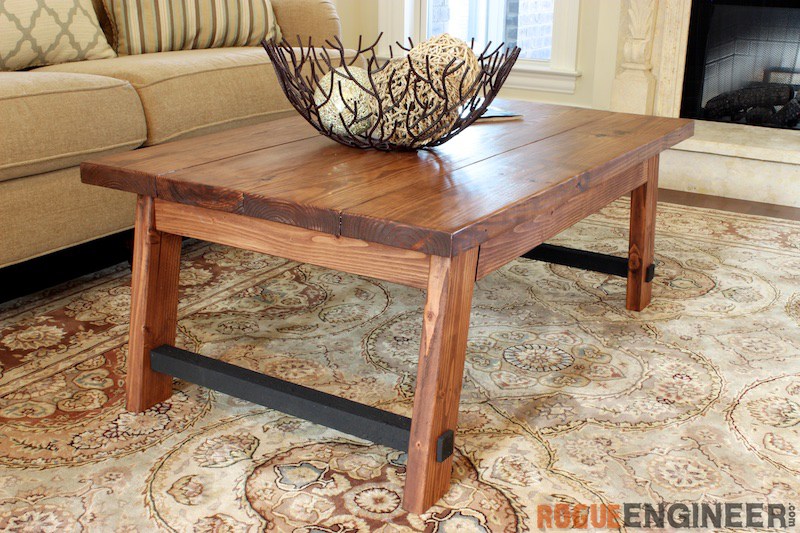
Credit: rogueengineer.com
Designing Your Side Table
Designing your side table is an exciting step in your DIY project. This phase lets you shape the table to fit your space and style perfectly.
Good design makes the table useful and beautiful. It should match your room and your needs.
Selecting The Style
Choose a style that fits your room’s look. Modern, rustic, or classic styles work well for side tables.
Think about the shapes and colors you like. The style should also suit what you will put on the table.
Simple designs are easier to build and fit many rooms. Bold designs can make your table a focal point.
Measuring And Planning Dimensions
Measure the space where the table will stand. This helps avoid a table that is too big or small.
Plan the height so it matches the furniture nearby. Usually, side tables are the same height as the sofa arm.
Decide the width and depth based on what you want to place on it. Leave enough space to move around easily.
Cutting And Preparing Wood
Cutting and preparing wood is the first important step in making a DIY side table. This process helps shape the wood into the parts you need. It also makes sure the wood is ready for assembly. Taking time here makes your project stronger and better looking.
Good preparation helps avoid problems during building. You need clean, smooth edges and correct sizes. This section explains how to cut wood safely and how to smooth rough surfaces.
Safety Tips For Cutting
Wear safety glasses to protect your eyes from dust and wood chips. Use ear protection if your tools are loud. Keep your hands away from the cutting path. Always cut on a stable surface to avoid slips. Use sharp blades for clean cuts and less force. Take breaks to stay focused and avoid mistakes.
Sanding And Smoothing Surfaces
Start with coarse sandpaper to remove rough spots and splinters. Sand along the grain of the wood, not across it. Switch to finer sandpaper for a smooth finish. Check all edges and surfaces to make sure they are even. Wipe dust off with a dry cloth before assembling. Smooth wood helps paint or stain stick better.
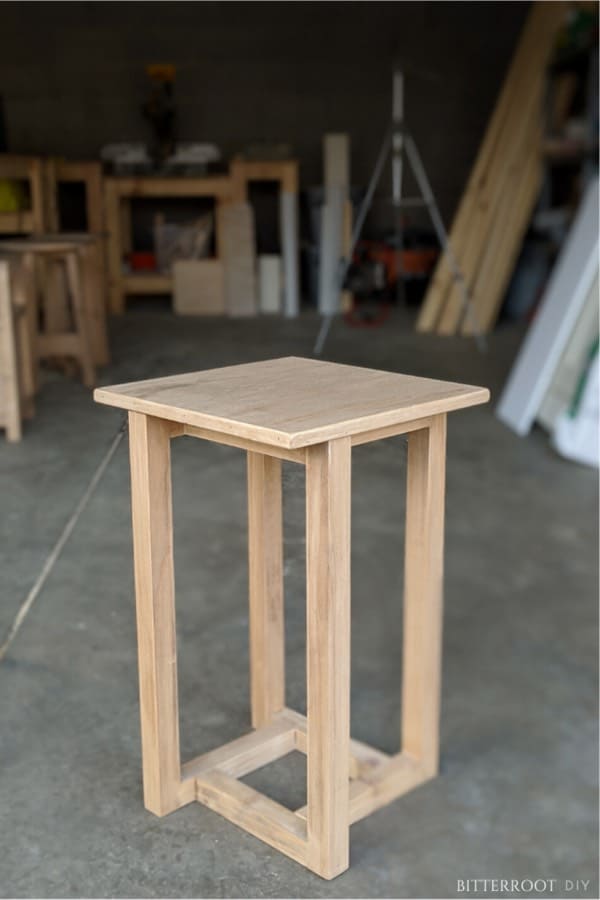
Credit: www.crazylaura.com
Assembling The Table
Assembling the side table is the step where your project starts to take shape. It brings all the pieces together for a sturdy and useful piece of furniture. Careful assembly ensures the table lasts long and looks great.
Joining Techniques
Start by choosing the right method to join the parts. Common techniques include screws, dowels, and wood glue. Screws provide strong hold and are easy to use. Dowels fit into holes and create a tight bond. Wood glue adds strength and keeps joints firm. Combining glue with screws or dowels works best for durability. Align parts carefully before fixing them together. This avoids gaps and keeps the table stable.
Securing Legs And Supports
Attach the legs firmly to the tabletop or frame. Use brackets or corner braces to add extra support. Screws must go in straight to prevent wobbling. Check each leg for even height before tightening. Supports under the table help carry weight and keep the table steady. Make sure all supports are fastened tightly. Test the table by pressing gently on the top. It should feel solid without any movement.
Finishing Touches
Finishing touches make your DIY side table stand out. They protect the wood and enhance its beauty. Small details create a polished, unique look. Choose finishes that suit your style and room decor. These final steps bring your project to life.
Painting And Staining Options
Painting adds color and personality to your side table. Use water-based paint for easy cleanup and quick drying. Light colors brighten a room, while dark shades add drama. Staining shows off the wood grain and adds warmth. Choose a stain that matches other furniture for a cohesive look. Apply a clear topcoat to protect the finish from scratches and spills.
Adding Decorative Elements
Decorative elements make your side table truly special. Attach metal or wooden knobs for a vintage feel. Use stencils to create patterns or shapes on the surface. Adding trim or molding gives the table a refined edge. Small decals or stickers can add a playful touch. These details personalize your piece and make it unique.
Maintaining Your Side Table
Maintaining your DIY side table keeps it looking fresh and sturdy. Regular care helps your table last longer. Small tasks can prevent big problems. This section shares easy tips to clean and fix your side table.
Cleaning Tips
Dust your side table often with a soft cloth. Avoid harsh chemicals that can damage the finish. Use a mild soap mixed with water for sticky spots. Wipe gently and dry immediately to stop water marks. Clean spills quickly to protect the wood or paint. Polish wood tables with a proper wood cleaner once a month. Keep the table away from direct sunlight to avoid fading.
Repairing Minor Damages
Small scratches can be hidden with a wood marker or crayon. For dents, try gently rubbing with a damp cloth and an iron. Loose screws should be tightened to keep the table stable. If paint chips, touch up with matching paint or stain. Use wood glue for small cracks and clamp until dry. Check joints regularly and fix any wobbles early. These simple repairs save money and keep your table strong.

Credit: www.grandmashousediy.com
Frequently Asked Questions
What Materials Are Best For A Diy Side Table?
Wood is the most popular choice for DIY side tables. Plywood and hardwood offer durability and ease of handling. Metal and glass can add a modern touch but may require special tools and skills. Choose materials based on your style and skill level.
How Long Does It Take To Build A Side Table?
Building a simple DIY side table usually takes 2 to 4 hours. More complex designs with additional features may take longer. Planning and preparation can reduce build time. Experience also influences how quickly you complete the project.
What Tools Are Needed For A Diy Side Table?
Essential tools include a saw, drill, measuring tape, and screwdriver. Sandpaper or a sander is needed for smooth finishes. Paintbrushes or rollers are required for painting or staining. Additional tools depend on your design complexity.
Can Beginners Successfully Build A Side Table?
Yes, beginners can build side tables with simple plans. Start with basic designs and clear instructions. Practice measuring, cutting, and assembling skills. Using pre-cut wood kits can also help ease the process.
Conclusion
Building your own side table is simple and fun. You save money and get exactly what you want. Plus, it feels great to use something you made yourself. Choose materials that suit your style and space. Take your time and enjoy each step.
Soon, you will have a unique piece to brighten your home. Try it and see how rewarding DIY projects can be!
As an Amazon Associate, I earn from qualifying purchases.