Are you looking to refresh your living room without spending a fortune? Creating your own wall art is a simple, fun way to add personality and style to your space.
Imagine turning blank walls into eye-catching displays that reflect your taste and creativity. You’ll discover easy DIY ideas that anyone can do, even if you don’t consider yourself an artist. Ready to transform your living room and impress your guests?
Let’s dive into the best DIY wall art projects that will make your home feel uniquely yours.
Choosing The Right Wall Art
Choosing the right wall art for your living room can change its entire feel. The right piece brings warmth and personality. It also connects the room’s look with your style. This choice needs thought about style, color, and space.
Matching Art To Room Style
Start by thinking about your living room style. Is it modern, classic, or rustic? Pick art that fits this style. For a modern room, choose simple and clean designs. For a rustic room, go with nature or vintage themes. Matching art keeps the room balanced and welcoming.
Selecting Colors And Themes
Colors in your wall art should match or complement your room’s colors. Use colors that make the room feel cozy and bright. Themes can be nature, abstract, or family photos. Pick themes that show your interests and make you happy. This helps create a personal and inviting space.
Considering Wall Size And Space
Look at the size of your wall before choosing art. Large walls need bigger or multiple pieces. Small walls suit small or medium art. Leave some space around the art so it does not feel crowded. Good spacing helps the art stand out and the room feel open.
Materials And Tools Needed
Creating your own wall art can be simple and fun. The right materials and tools help you make pieces that fit your style. Knowing what you need saves time and money. This section covers all basics to start your DIY wall art project.
Basic Supplies For Diy Art
Start with a canvas or thick paper as your base. Use acrylic paints for bright colors and easy cleanup. Brushes in different sizes help create details. Markers or pencils allow sketching before painting. Tape is useful for making clean lines or patterns.
Where To Find Affordable Materials
Check craft stores for sales and discounts. Dollar stores often have paints, brushes, and paper. Thrift shops can offer unique frames and canvases. Online marketplaces provide many options at low prices. Reuse old materials to save money and reduce waste.
Essential Tools For Beginners
Get a ruler for straight lines and measuring. Scissors and craft knives help cut shapes and paper. A palette or plate works well for mixing paints. Keep some cloth or paper towels handy for cleaning. Use a small container to hold water for brushes.
Creative Diy Wall Art Ideas
Creative DIY wall art ideas bring a fresh look to your living room. Crafting your own pieces makes your space unique. It also lets your personality shine through every brushstroke and design. These ideas are simple, fun, and perfect for all skill levels.
Use colors, shapes, and words to express yourself. Each project adds a special touch to your walls. Explore different styles and materials to find what fits your home best.
Abstract Paintings And Patterns
Abstract art lets you play with colors and shapes freely. Use brushes, sponges, or even your hands to create patterns. Mix bright and soft colors for contrast. Try splattering paint for a lively effect. Abstract pieces bring energy and creativity to any wall.
Nature-inspired Designs
Bring the outdoors inside with nature-inspired art. Paint leaves, flowers, or trees using gentle strokes. Use natural colors like greens, browns, and blues. Press real leaves or flowers into your art for texture. These designs create a calm and peaceful atmosphere.
Geometric Shapes And Lines
Geometric art uses simple shapes like circles, squares, and triangles. Draw clean lines with tape or stencils for sharp edges. Combine shapes to make interesting patterns. Use bold colors or keep it minimal with black and white. This style gives a modern, sleek look to your living room.
Typography And Quote Art
Words inspire and decorate your space beautifully. Write your favorite quotes or phrases in stylish fonts. Use stencils or freehand for lettering. Paint on canvas, wood, or paper. Choose colors that match your room’s theme. Typography art adds meaning and personality to your walls.
Mixed Media And Collage
Combine different materials like paper, fabric, and paint. Cut shapes and images from magazines or old books. Layer materials for depth and texture. Glue everything onto a canvas or board. Mixed media art is creative and unique. It lets you experiment with many styles at once.
:strip_icc()/102340212-480ff93eabdb4e96a3deaeb5b1d6a317.jpg)
Credit: www.bhg.com
Techniques For Stunning Results
Creating DIY wall art for your living room can be exciting and rewarding. Using the right techniques will help you achieve beautiful, eye-catching results. Simple methods can add depth and style to your art pieces. Experimenting with different tools and materials brings uniqueness to your walls.
Painting Tips And Tricks
Choose quality brushes for smooth strokes and clean lines. Use painter’s tape to protect edges and create sharp borders. Thin your paint with water for better flow and lighter layers. Let each layer dry before adding the next to avoid smudging. Mix colors on a palette to find perfect shades. Practice on paper before painting on your final surface.
Using Stencils And Masks
Stencils help create repeatable and precise shapes easily. Secure stencils with tape to keep them from moving. Use a sponge or stencil brush for dabbing paint gently. Remove stencils carefully to avoid smearing fresh paint. Masks cover parts of your art for multi-layered effects. Combine different stencil designs for a custom look.
Layering And Texture Effects
Build layers using paint, glue, or mediums for rich texture. Use tools like palette knives or sponges to add patterns. Dry brushing highlights raised areas with light color. Add sand or small beads to paint for rough texture. Layering different colors creates depth and interest. Let textures dry fully before adding more layers.
Incorporating Fabric And Paper
Glue fabric scraps or patterned paper for mixed-media art. Use decoupage glue for a smooth, lasting finish. Cut shapes or strips to create interesting designs. Layer papers with different colors or prints. Fabric adds softness and tactile appeal to your piece. Seal your work with a clear coat to protect it.
Arranging And Hanging Wall Art
Arranging and hanging wall art can change the whole look of your living room. It makes the space feel personal and stylish. The right arrangement brings balance and harmony to the walls. Hanging art properly keeps it safe and looking great for years.
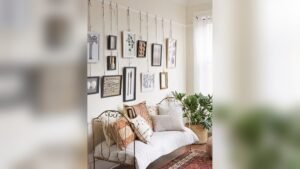
Creating Gallery Walls
Gallery walls show many pieces of art in one space. Start by choosing a theme or color scheme. Lay the pieces on the floor first to plan the layout. Use different frames but keep a similar style or color. Keep the spacing between frames equal for a neat look. Place the largest piece in the center or off to one side. Fill in with smaller pieces around it. This style adds interest and tells a story.
Balancing Sizes And Shapes
Mixing sizes and shapes makes the wall more lively. Combine squares, rectangles, and circles for variety. Avoid placing all large or all small pieces together. Balance big pieces with smaller ones nearby. Use odd numbers of items for a natural feel. Keep the arrangement centered on the wall or sofa. Balance helps the eye move smoothly across the display.
Safe And Secure Hanging Methods
Use the right tools to hang your art safely. Picture hooks and nails work well for most frames. For heavier pieces, use wall anchors or screws. Measure twice before drilling holes. Use a level to keep frames straight. Avoid hanging art too high or too low. Secure hanging prevents accidents and protects your wall art.
Personalizing Your Art
Personalizing your wall art makes your living room feel unique and welcoming. It turns blank walls into a story about you and your loved ones. Simple touches bring warmth and character to your space. Personal art creates a connection that mass-produced pieces cannot.
Adding Family Photos And Memories
Family photos add a special touch to your wall art. Choose pictures that bring happy memories. Print them in different sizes for variety. Use frames that match your room’s style. Group photos in a collage or line them up for a neat look. These images remind you of good times every day.
Customizing With Colors And Patterns
Colors set the mood of your living room. Pick shades that make you feel calm or energized. Use patterns to add interest and texture. Stripes, dots, or geometric shapes work well. Paint or fabric can help you create these designs. Matching colors and patterns to your furniture ties the room together.
Incorporating Personal Symbols
Symbols show your beliefs and passions. They can be simple shapes or icons that mean something to you. Maybe a favorite animal, a hobby, or a meaningful sign. Paint or craft these symbols on canvas or wood. This adds a personal story to your art. It makes your living room truly yours.
Budget-friendly Wall Art Projects
Creating wall art for your living room does not need to be expensive. Budget-friendly projects make decorating easy and fun. You can use materials you already have or find cheap supplies. This way, you save money and add a personal touch to your space.
Repurposing Old Materials
Old materials are perfect for new wall art. Use scraps of wood, fabric, or even old books. Cut, paint, or arrange them to create unique designs. This method reduces waste and gives new life to items you no longer use.
Using Recycled And Natural Elements
Recycled items like bottle caps, paper, or tin cans can become art pieces. Natural elements such as leaves, twigs, and stones add texture and color. Combining these materials creates a fresh and organic look on your walls.
Affordable Alternatives To Expensive Art
Print your own photos or artwork on paper. Frame them with inexpensive frames or make your own from cardboard. Use stencils or stamps to create patterns on canvas or wood. These alternatives look stylish without high costs.
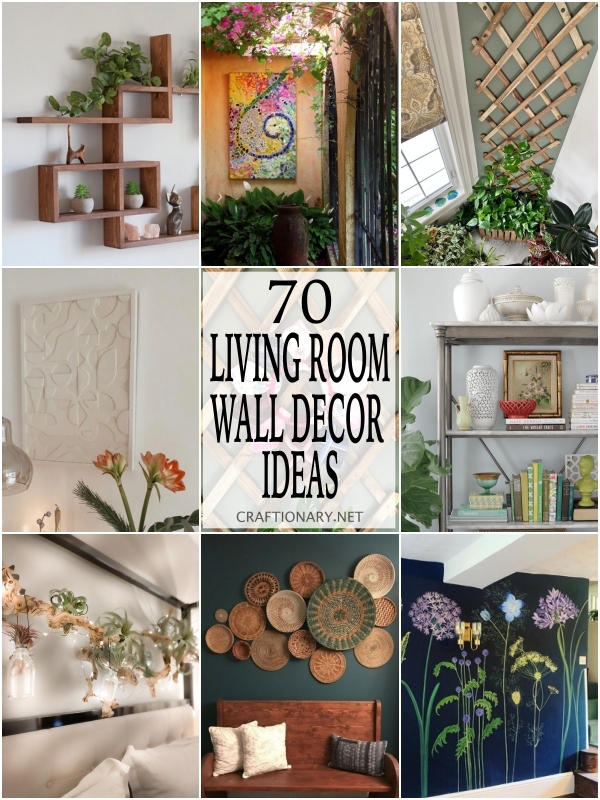
Credit: www.craftionary.net
Maintaining And Updating Wall Art
Maintaining and updating wall art keeps your living room fresh and inviting. Simple care routines help your DIY creations last longer. Small changes can brighten the space and reflect new styles. Stay creative with easy ways to clean, preserve, and refresh your wall art.
Cleaning And Preservation Tips
Dust your wall art regularly with a soft cloth. Avoid harsh chemicals that can damage paint or paper. Use a gentle brush for textured surfaces. Keep art away from direct sunlight to prevent fading. Control room humidity to protect delicate materials. Frame your artwork with glass or acrylic for extra protection.
Seasonal And Trend Updates
Change your wall art according to seasons or holidays. Swap bright colors for warm tones in autumn. Add light and fresh designs during spring. Follow simple trends like geometric shapes or nature themes. Rotate pieces to keep your space interesting. Small updates keep your room feeling new.
Easy Ways To Refresh Your Display
Move your art to a new spot on the wall. Mix different sizes and styles for a gallery look. Add shelves to show small sculptures or plants. Use washi tape for temporary, colorful frames. Combine DIY art with store-bought pieces for variety. Refreshing your display takes minutes and adds charm.

Credit: joyfulderivatives.com
Frequently Asked Questions
What Materials Do I Need For Diy Wall Art?
You need canvas, paint, brushes, stencils, and adhesive hooks. Basic tools like scissors and tape are helpful. Choose materials based on your design and wall surface. Quality materials enhance durability and appearance.
How Can I Match Diy Art With Living Room Decor?
Use colors that complement your furniture and walls. Pick themes that reflect your style or room purpose. Balance size and placement to avoid clutter. Consistency creates a harmonious and inviting space.
What Are Easy Diy Wall Art Ideas For Beginners?
Try abstract painting, geometric shapes, or framed fabric. Use stencils or printable templates for precise designs. Collages with photos or magazine cutouts work well. Start simple and build confidence with practice.
How Do I Hang Diy Wall Art Securely?
Use appropriate hooks or anchors for your wall type. Measure and mark spots before drilling or nailing. Use a level to ensure straight placement. Proper hanging prevents damage and keeps art safe.
Conclusion
Creating your own wall art adds a personal touch to your living room. It makes the space feel warm and inviting. You can choose colors and designs that suit your style. Plus, it is a fun and budget-friendly way to decorate.
Experiment with different ideas and materials. Small changes can make a big difference. Enjoy the process and watch your living room come alive. DIY wall art brings creativity and charm to your home. Give it a try and see the results yourself.
As an Amazon Associate, I earn from qualifying purchases.