Are you struggling to hang your wall art just right? You’re not alone.
Getting your pictures, paintings, or prints perfectly aligned can change the entire look of your room. But it’s not always easy to know where to start or what tools to use. In this guide, you’ll discover simple, step-by-step tips that anyone can follow.
By the end, you’ll feel confident transforming your walls into a stunning display that reflects your style. Ready to make your space truly yours? Let’s dive in!
Choosing The Right Wall Art
Choosing the right wall art shapes the look and feel of a room. It brings personality and style to plain walls. The right piece can brighten the space and create a focal point. Select art that fits your space and reflects your taste. Balance size, color, and theme for the best effect.
Selecting Art That Matches Your Space
Pick wall art that fits the room’s purpose and mood. Soft, calm images suit bedrooms or relaxation areas. Bold, vibrant pieces work well in living rooms or kitchens. Consider the room’s color scheme and style. Choose art that blends with or complements the existing decor.
Considering Size And Scale
Size matters when hanging wall art. Large pieces fill big walls and make a strong statement. Small art fits better in tight spaces or grouped with others. Measure your wall before buying. The art should not overpower or look lost on the wall.
Mixing Styles And Mediums
Mixing styles adds interest and personality to a room. Combine paintings, prints, photos, and sculptures for variety. Blend modern and traditional pieces for a unique look. Keep some harmony by using a common color or theme. This balance keeps the display attractive and cohesive.

Credit: www.ballarddesigns.com
Preparing Your Wall
Preparing your wall is the first step to hang wall art properly. A clean and smooth wall helps the art stay secure. It also makes the display look better. Taking time to prepare will save trouble later.
Cleaning And Repairing Surfaces
Start by cleaning the wall with a damp cloth. Remove dust, dirt, and grease. Let it dry completely before hanging anything. Check for holes, cracks, or peeling paint. Fill holes with spackle and smooth the surface. Sand rough spots gently to create an even wall.
Finding The Perfect Spot
Choose a spot that matches your room’s style. Consider lighting and wall space. Make sure the art will not block switches or outlets. Think about eye level for best viewing. Center the art on the wall or above furniture for balance.
Measuring And Marking
Use a tape measure to find the right height and position. Mark the spot lightly with a pencil. Use a level to keep the marks straight. Measure twice to avoid mistakes. These marks guide you where to place nails or hooks.
Tools And Materials Needed
Hanging wall art looks easy, but the right tools make all the difference. Using proper tools and materials keeps your art safe and your walls damage-free. Prepare everything before you start. This saves time and avoids mistakes.
Basic Hanging Tools
Start with a hammer. It drives nails and hooks into the wall. A tape measure helps place your art at the perfect height. A pencil lets you mark spots on the wall without damage. A screwdriver is handy for screws or hooks. Keep a pair of pliers nearby for small adjustments.
Wall Anchors And Hooks
Wall anchors support heavier art on drywall. They prevent nails from pulling out. Plastic or metal anchors work well. Choose anchors based on your wall type and art weight. Hooks come in many sizes and shapes. Use hooks with weight ratings that match your art.
Leveling Devices
A level keeps your art straight. A small bubble level fits in your hand and is easy to use. Laser levels project a straight line across the wall. They help align multiple pieces perfectly. Using a level stops crooked art and improves room appearance.

Credit: studio-mcgee.com
Hanging Techniques
Hanging wall art can change a room’s look fast. Choosing the right hanging technique keeps your art safe and your walls clean. Different types of art need different methods. Here are simple ways to hang your art with care and style.
Using Nails And Picture Hooks
Nails and picture hooks work well for most art pieces. Use a small nail or hook to support the frame’s weight. Tap the nail gently into the wall at a slight angle. Hang the art on the hook or nail. This method holds well and is easy to adjust.
Make sure to use the right size hook for your art. Heavy frames need stronger hooks. Light pieces only need small nails.
Employing Adhesive Strips
Adhesive strips offer a no-hole option for hanging. Stick the strips to the back of the frame and press it firmly on the wall. They hold well on smooth surfaces. These strips are easy to remove without damage.
Choose strips rated for your art’s weight. Clean the wall before applying strips. This ensures strong adhesion and prevents peeling.
Mounting Heavy Art Safely
Heavy art needs extra care to avoid accidents. Use wall anchors or screws for strong support. Find a stud behind the wall for best hold. Use a stud finder to locate it.
Drill pilot holes before inserting screws. Hang the frame on the screws or hooks attached to anchors. This method keeps heavy art secure and protects your walls from damage.
Arranging Multiple Pieces
Arranging multiple pieces of wall art can transform a plain wall into a stunning display. It creates a personal space filled with style and charm. Planning the layout carefully helps avoid clutter and chaos. This section guides you on how to arrange several artworks beautifully and harmoniously.
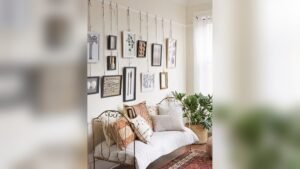
Creating Gallery Walls
Gallery walls group different art pieces in one area. Start by selecting a theme or color scheme for unity. Lay the pieces on the floor to test arrangements before hanging. Use paper cutouts of the frames on the wall to visualize spacing. Mix sizes and shapes to add interest. Keep the center of the gallery at eye level for easy viewing.
Spacing And Alignment Tips
Keep equal spacing between each piece for a neat look. A gap of 2 to 4 inches works well for most walls. Align the tops or centers of artworks for balance. Use a level tool to ensure straight lines. Avoid placing pieces too close to corners or furniture. Leave some empty space around the art to let it breathe.
Balancing Colors And Shapes
Balance bright and neutral colors across the display. Spread similar colors evenly to avoid clustering. Mix round, square, and rectangular frames for variety. Place larger or darker pieces at the bottom to anchor the arrangement. Use repetition of shapes or colors to create rhythm. This balance keeps the wall art pleasing to the eye.
Maintaining Your Wall Art
Maintaining your wall art keeps it looking fresh and beautiful. Proper care helps preserve colors and materials. It also prevents damage and extends the life of your art. Follow simple steps to protect and clean your pieces regularly.
Protecting From Sunlight And Dust
Direct sunlight can fade colors quickly. Place art away from windows or use curtains. Dust settles on surfaces and dulls the appearance. Use glass frames or acrylic covers to shield from dust. These steps keep your art vibrant and clean.
Regular Cleaning Tips
Dust wall art gently with a soft cloth. Avoid harsh cleaners that might damage paint or paper. Use a dry microfiber cloth for paintings and prints. For glass frames, lightly dampen the cloth with water. Clean regularly to prevent dirt build-up.
Avoiding Damage Over Time
Keep wall art away from moisture and heat sources. These can cause warping or mold growth. Use sturdy hooks and nails for hanging to prevent falls. Check hanging hardware periodically for stability. Small efforts protect your art from long-term harm.

Credit: www.kathykuohome.com
Frequently Asked Questions
How Do I Choose The Right Height For Hanging Wall Art?
Hang wall art at eye level, typically 57-60 inches from the floor. This height ensures easy viewing and creates a balanced look in any room. Adjust slightly based on furniture height or ceiling size for the best visual impact.
What Tools Are Needed To Hang Wall Art Securely?
You need a measuring tape, level, pencil, hammer, nails or screws, and anchors. These tools help ensure your art is straight and securely fixed to the wall, preventing damage and keeping your decor safe.
How Can I Hang Heavy Wall Art Safely?
Use wall anchors or toggle bolts rated for the art’s weight. Locate studs with a stud finder for extra support. Always follow weight guidelines to avoid accidents and keep your wall and artwork intact.
What Is The Best Way To Hang Multiple Wall Art Pieces?
Arrange art in a gallery style with consistent spacing, usually 2-3 inches apart. Plan the layout on the floor first. Use a level and measuring tape to maintain alignment and balance on the wall.
Conclusion
Hanging wall art can change any room’s feel. Choose the right spot and tools first. Measure carefully to keep everything straight. Use anchors for heavy pieces to stay safe. Step back often to check your work. Small details make a big difference in style.
Take your time and enjoy the process. Your walls will look great and reflect you. Simple steps lead to beautiful results every time.
As an Amazon Associate, I earn from qualifying purchases.