Have you ever wanted a stylish side table that fits perfectly in your space but couldn’t find one that matches your style or budget? What if you could create your own, tailored exactly to your needs?
Making a side table is easier than you think, and it can add a personal touch to your home that store-bought furniture simply can’t match. In this guide, you’ll discover simple steps to build a side table that looks great and feels rewarding to make.
Ready to bring your creativity to life and transform your room? Let’s get started!
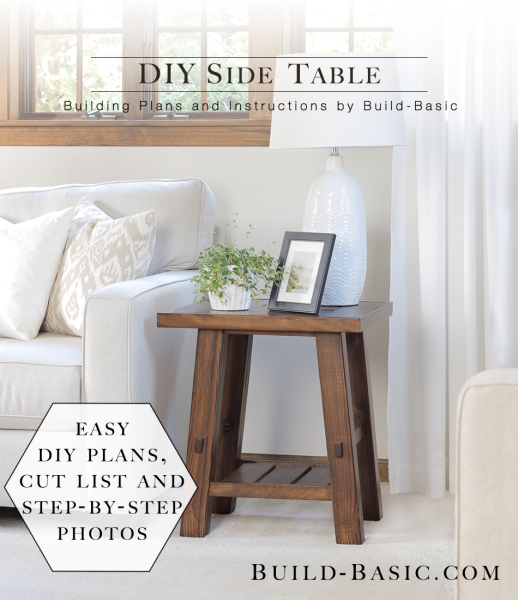
Credit: build-basic.com
Choosing The Right Materials
Choosing the right materials is the first step to building a strong side table. The materials affect the table’s look, feel, and how long it lasts. Picking good wood and tools makes the work easier. It also helps create a table that fits your style and needs.
Understanding the types of wood, tools, and finishing supplies is important. This knowledge helps avoid mistakes and saves time. Below are key points to consider when selecting materials for your side table.
Wood Types For Side Tables
Choose wood that suits your style and budget. Pine is soft, easy to cut, and affordable. Oak is hard, strong, and has a nice grain pattern. Walnut is darker and gives a rich, classic look. Avoid wood that bends or cracks easily. Check for smooth surfaces and straight grain to ensure quality.
Tools You’ll Need
Gather basic tools before starting your project. A saw cuts the wood pieces. A drill makes holes for screws. Sandpaper smooths rough edges. A measuring tape ensures accurate cuts. Clamps hold pieces together while gluing. Having the right tools speeds up the process and improves results.
Finishing Supplies
Finishing gives your table a polished look and protects wood. Use wood stain to change color and highlight grain. Apply clear varnish or polyurethane for a shiny, durable surface. Brushes or rags help spread finishes evenly. Sand lightly between coats for a smooth finish. Proper finishing keeps your side table looking great for years.
Planning Your Design
Planning your side table design is the first step to a successful project. It helps you organize ideas and materials. A clear plan saves time and avoids mistakes. This stage focuses on practical choices like size, style, and shape. Start with simple sketches and measurements. Think about where you will place the table and what it will hold. Keep your design both useful and attractive. Good planning leads to a side table you enjoy for years.
Measuring And Sketching
Measure the space where the side table will go. Note the width, depth, and height available. Use a tape measure for accuracy. Sketch your ideas on paper. Draw the table from different angles. Simple lines show the basic shape. Mark key measurements on your sketch. This helps check if your design fits the space. Adjust your drawing if needed. Clear sketches guide you during building.
Selecting A Style
Choose a style that matches your room. Think about modern, rustic, or classic looks. Pick one that fits your furniture and walls. Style affects the shape, color, and materials. For example, wood suits rustic designs. Metal works well for modern tables. Keep your choice simple to build easily. A consistent style creates a balanced room feel.
Deciding On Size And Height
Size matters for comfort and use. A side table should be easy to reach from your seat. Standard height ranges from 20 to 28 inches. Match the table height with your chair or sofa. Width and depth depend on space and purpose. Allow room for lamps, drinks, or books. Make sure the table does not block walking paths. Correct size makes the table practical and neat.
Cutting And Preparing Wood
Cutting and preparing wood is the first step to building a sturdy side table. This stage sets the foundation for the entire project. Accurate cuts and smooth edges ensure the table looks neat and fits together well. Taking your time here saves effort later.
Marking Measurements
Start by measuring each piece of wood carefully. Use a pencil to mark exact lines where you will cut. Double-check all measurements before marking. Clear, visible lines help guide your saw and avoid mistakes. Measure twice, cut once.
Safe Cutting Techniques
Always wear safety goggles and gloves before cutting. Use a stable surface to place your wood. Cut slowly and steadily along the marked lines. Keep your hands away from the blade. A sharp saw makes cleaner cuts and reduces effort.
Sanding For Smooth Edges
After cutting, sand all edges to remove splinters. Use medium-grit sandpaper first to smooth rough surfaces. Follow with fine-grit paper for a polished finish. Sand in the direction of the wood grain. Smooth edges prevent injuries and improve appearance.
Assembling The Table
Assembling the side table is the step where all parts come together. It requires careful attention to detail. Proper assembly ensures a strong and durable table. Follow simple steps to build your table with confidence.
Joining Techniques
Choose the right joining method for your table parts. Common techniques include dowels, biscuits, and wood glue. Dowels fit into drilled holes to hold pieces tight. Biscuits are thin wooden pieces that align and join parts. Wood glue strengthens the joints and keeps them secure. Combine these methods for a lasting bond.
Using Screws And Nails
Screws provide firm hold and easy adjustment. Pre-drill holes to avoid wood splitting. Use screws suitable for wood thickness. Nails are faster but less strong than screws. Use finishing nails for a clean look. Drive nails carefully to prevent damage. Both tools help fasten legs and tabletop firmly.
Ensuring Stability
Check that all parts fit snugly. Tighten screws and wipe off excess glue. Place the table on a flat surface to test balance. Shim legs if the table wobbles. Add corner braces for extra support. A stable table lasts longer and feels safer to use.
Adding Finishing Touches
Adding finishing touches to your side table gives it a polished, professional look. These final steps protect the wood and enhance its beauty. They also make your table unique and match your room’s style.
Painting And Staining
Choose paint or stain that fits your room’s color scheme. Paint covers the wood fully and offers many color options. Stain soaks into the wood, showing its natural grain. Apply thin coats with a brush or cloth for even color. Let each coat dry before adding the next. Sand lightly between coats for a smooth finish.
Applying Sealant
Sealant protects your table from water, scratches, and dirt. Use clear polyurethane or varnish for strong protection. Apply with a clean brush in thin layers. Let the sealant dry completely before using the table. Multiple coats increase durability and shine. Light sanding between coats keeps the surface smooth.
Decorative Elements
Add personality with decorative touches. Use stencils or painter’s tape to create patterns. Attach small hardware like knobs or handles for style and function. Consider attaching felt pads under the legs to protect floors. Use decals or wood burning for custom designs. Small details make your side table truly yours.
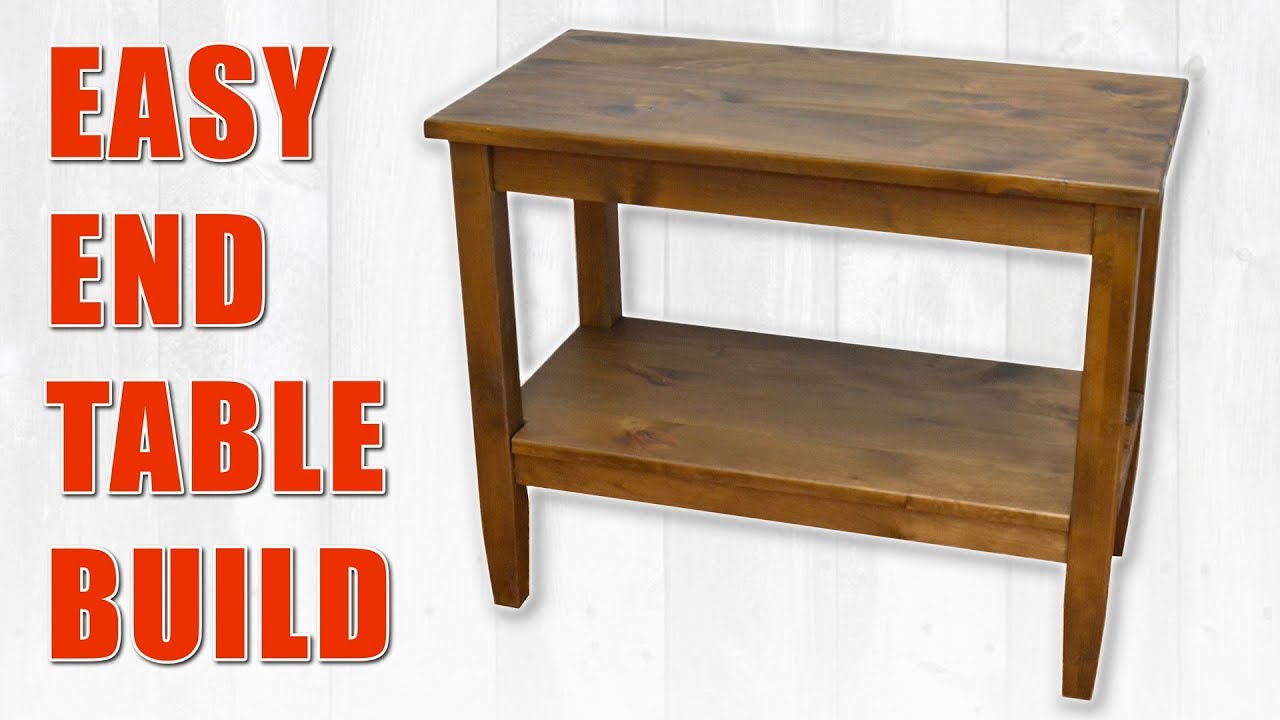
Credit: www.youtube.com
Maintaining Your Side Table
Keeping your side table in good shape helps it last longer and look great. Regular care is key. This section covers simple ways to maintain your side table. Follow these easy steps to keep it clean, fix small problems, and protect it over time.
Cleaning Tips
Dust your side table often with a soft cloth. Use a damp cloth for sticky spots. Avoid harsh chemicals that can damage the finish. Mild soap and water work well. Dry the table completely after cleaning. This keeps the wood or surface safe and shiny.
Repairing Minor Damage
Small scratches or dents happen. Lightly sand damaged spots with fine sandpaper. Apply wood filler for deep dents. Match the paint or stain to fix the color. Let it dry fully before use. These quick fixes keep your table looking new.
Long-term Care
Place your side table away from direct sunlight. Avoid areas with high humidity or heat. Use coasters to protect from water rings and stains. Tighten screws and bolts regularly. This prevents wobbling and keeps the table sturdy. Long-term care ensures your table stays useful and attractive for years.

Credit: liagriffith.com
Frequently Asked Questions
What Materials Are Needed To Make A Side Table?
You need wood, screws, sandpaper, wood glue, paint, and finishing varnish. Optional tools include a saw, drill, and clamps. Choose materials based on your design and durability preferences. Quality materials ensure a sturdy and attractive side table.
How Long Does It Take To Build A Side Table?
Building a side table typically takes 3 to 6 hours. Time depends on your skill level, tools, and design complexity. Simple designs take less time, while detailed finishes require more attention. Proper planning speeds up the process and improves results.
Can Beginners Make A Side Table Easily?
Yes, beginners can make a side table with basic tools and clear instructions. Start with simple designs and follow step-by-step guides. Practice safety and measure carefully. Building your own side table improves skills and provides a rewarding experience.
How Do I Finish And Protect My Side Table?
Apply wood stain or paint, then seal with a clear varnish or polyurethane. This protects against scratches and moisture. Sand lightly between coats for a smooth finish. Proper finishing enhances durability and appearance of your side table.
Conclusion
Building a side table is simple and rewarding. You only need basic tools and materials. Follow the steps carefully and take your time. Your new table will add charm and function to any room. Enjoy the satisfaction of creating something with your own hands.
Small projects like this boost confidence and skills. Try different styles as you gain experience. Keep practicing, and you’ll get better each time. Making furniture yourself saves money and lets you personalize your space. Start today and see how fun woodworking can be!
As an Amazon Associate, I earn from qualifying purchases.