Looking for a smart way to add extra storage and style to your home? You’re in the right place.
Making your own storage ottoman is easier than you think, and it gives you a unique piece that fits perfectly with your space. Imagine having a cozy spot to sit, a place to stash your blankets, and a stylish accent all in one.
Ready to transform your room and save money? Keep reading, and you’ll discover simple steps to create a storage ottoman that’s both functional and beautiful—designed just by you, for your home.
Credit: livelaughrowe.com
Choosing The Right Materials
Choosing the right materials is key to making a sturdy and attractive storage ottoman. The materials affect how strong and comfortable the ottoman will be. Good choices also make the ottoman last longer. Focus on wood, fabric, and tools for the best results.
Selecting Wood And Frame
Start with wood that is strong and easy to work with. Pine and plywood are popular choices for the frame. Pine is light and affordable. Plywood is stable and less likely to warp. Make sure the wood pieces are smooth and free of cracks. The frame should hold weight and keep shape.
Picking Upholstery Fabric
Choose fabric that is durable and easy to clean. Cotton and linen work well for a soft, natural feel. Synthetic fabrics like polyester resist stains and wear. Think about the room style and color when picking fabric. The fabric should cover the ottoman smoothly without wrinkles.
Gathering Tools And Supplies
Gather all needed tools before starting your project. You will need a saw, drill, hammer, and screwdriver. Get staples and upholstery foam for padding. Sandpaper smooths the wood edges. Measuring tape and pencil help with precise cuts. Having all supplies ready saves time and stress.
Preparing The Frame
Preparing the frame is the first step in making a storage ottoman. It gives the ottoman its shape and strength. A solid frame keeps the ottoman sturdy and durable. Start with good quality wood to ensure long-lasting support. Take your time to measure and cut the pieces carefully. Precision here makes assembly easier and ensures the ottoman fits together well.
Measuring And Cutting Wood
Measure the wood pieces based on your ottoman size plan. Use a tape measure and mark the wood clearly. Cut the wood with a saw, following your marks exactly. Smooth rough edges with sandpaper for safety and neatness. Accurate cuts help the frame fit perfectly without gaps.
Assembling The Base
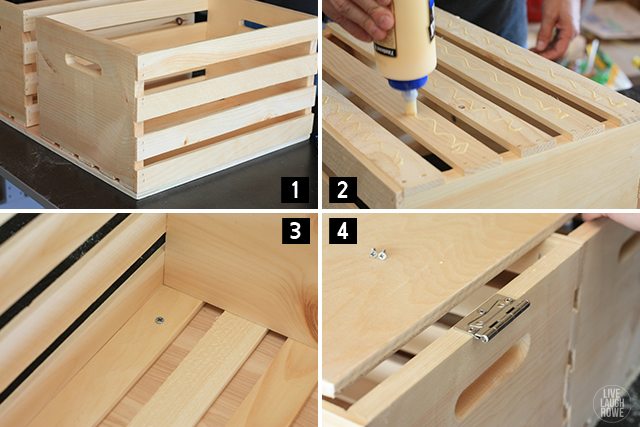
Arrange the cut wood pieces to form the base frame. Use wood glue and screws to join the parts firmly. Check that the base is square by measuring the diagonals. Tighten screws securely to prevent wobbling. A solid base supports the weight and keeps the ottoman steady.
Creating The Lid
Cut a wood panel for the lid, matching the base size. Attach a frame underneath the lid for strength. Sand all edges to make the lid smooth and safe. Add hinges to connect the lid to the base. Ensure the lid opens and closes easily without gaps.
Adding Storage Features
Storage ottomans are useful because they save space and keep things tidy. Adding storage features means making the inside of the ottoman functional. This step helps you organize items like blankets, books, or toys neatly. A good design makes it easy to open and close while keeping everything safe inside.
Focus on building compartments inside to separate items. Use strong hinges and supports to hold the lid in place. These features improve the ottoman’s durability and convenience.
Building Internal Compartments
Start by measuring the inside of the ottoman carefully. Use thin wood or sturdy cardboard to create dividers. These dividers help sort items and keep them from moving around.
Attach the dividers using glue or small nails. Make sure they fit tightly and stand firm. You can design compartments of different sizes for various items.
Installing Hinges And Supports
Choose hinges that can hold the weight of the lid and items inside. Soft-close hinges are good for smooth opening and closing.
Fix the hinges on both the ottoman frame and lid. Use screws that fit well and hold tightly. Add support stays to stop the lid from falling backward.
Test the lid by opening and closing it several times. Make sure it stays open without slipping. Proper hinges and supports keep the ottoman safe and easy to use.

Credit: www.thisoldhouse.com
Upholstering The Ottoman
Upholstering the ottoman gives it style and comfort. It is the step where fabric and padding come together. This process makes the ottoman both useful and attractive.
Cutting And Attaching Foam
Start by cutting foam to fit the ottoman top. Use scissors or a sharp knife for clean edges. Attach foam using spray adhesive or glue. Press firmly to secure the foam in place. This adds softness and shape to the ottoman.
Wrapping And Securing Fabric
Choose fabric that matches your room’s style. Cut fabric with extra length to wrap around sides. Place fabric over foam and smooth wrinkles. Pull fabric tight and staple it underneath the ottoman base. Check all sides to ensure fabric stays tight and neat.
Adding Decorative Touches
Add buttons or tufting for a classic look. Use trim or nailhead accents for extra style. Consider sewing a fabric cover for easy cleaning. Decorative touches make the ottoman unique and fit your decor.
Finishing Touches
Finishing touches make your storage ottoman complete and stylish. These final steps improve its look, feel, and function. Focus on details that blend well with your room. A polished ottoman stands out for comfort and design.
Attaching Legs Or Casters
Legs or casters add height and mobility. Choose legs that match your room’s style. Screw them firmly into the base for stability. Casters let you move the ottoman easily. Make sure casters lock in place for safety.
Applying Paint Or Stain
Paint or stain protects the wood and adds color. Sand the surface lightly before applying. Use smooth, even strokes for a neat finish. Let each coat dry fully before adding another. Pick colors that fit your decor.
Ensuring Durability And Safety
Check all parts for tightness and strength. Use wood glue for extra hold. Avoid sharp edges by sanding corners smooth. Test the ottoman by sitting or placing weight on it. Make sure the lid opens and closes safely.

Credit: www.youtube.com
Styling And Placement Ideas
Storage ottomans are practical and stylish furniture pieces. They keep your space organized and add charm. Choosing the right style and place can change a room’s feel. Let’s explore ideas to style and place storage ottomans effectively.
Think about the color, texture, and size. These details help the ottoman fit your room. Placement affects comfort and use. Finding the perfect spot makes your home look neat and cozy.
Matching Home Decor
Choose an ottoman that matches your room’s colors. Soft fabrics like velvet or linen bring warmth. Leather adds a classic touch. Pick colors that blend or contrast nicely.
Patterns can add life to plain rooms. Keep patterns simple for small spaces. Use ottomans to repeat colors in pillows or rugs. This creates a balanced and inviting look.
Using Ottomans In Different Rooms
In the living room, use ottomans as extra seating or footrests. They can also serve as a coffee table with a tray on top. In bedrooms, place an ottoman at the foot of the bed for storage and seating.
Hallways can benefit from slim ottomans for putting on shoes. Kids’ rooms need sturdy, easy-to-clean ottomans for toys. In offices, ottomans offer a break spot and hide clutter.
Frequently Asked Questions
What Materials Are Needed To Make Storage Ottomans?
To make storage ottomans, you need wood, fabric, foam, hinges, and nails. These materials ensure durability and comfort. Choose quality fabric and sturdy wood for best results. Foam provides cushioning, while hinges allow easy lid opening.
How Long Does It Take To Build A Storage Ottoman?
Building a storage ottoman typically takes 3 to 5 hours. This depends on your skill level and tools available. Preparing materials and allowing glue or paint to dry can extend the total time.
Can Beginners Make Storage Ottomans At Home?
Yes, beginners can make storage ottomans with basic woodworking skills. Follow step-by-step instructions carefully. Using simple tools and pre-cut wood can simplify the process. It’s a great DIY project for improving skills.
How Do I Customize The Size Of A Storage Ottoman?
Customize the size by measuring your space and adjusting wood dimensions. Keep proportions balanced for comfort and aesthetics. Use a sturdy frame to support the chosen size. Custom sizing ensures the ottoman fits your needs perfectly.
Conclusion
Making storage ottomans is easier than you think. Just follow simple steps and use basic tools. You can create a useful piece for your home. It saves space and looks nice too. Plus, you get to choose your own style and color.
Try making one today and enjoy a tidy, stylish room. Small projects like this bring big satisfaction. Why not start now?
As an Amazon Associate, I earn from qualifying purchases.