Are you struggling to place tables side by side in Google Docs and making your document look cluttered? You’re not alone.
When you want to organize information clearly and save space, putting tables next to each other can make a huge difference. But Google Docs doesn’t offer a simple button for this, which can leave you feeling stuck. You’ll discover easy and practical ways to put tables side by side, so your documents look neat and professional.
Keep reading, and you’ll master this useful trick in no time!
Insert Tables In Google Docs
Inserting tables in Google Docs helps organize data clearly. Tables break content into rows and columns. This layout makes information easier to read and compare.
Google Docs offers simple tools to add and customize tables. You can create tables of different sizes. Then adjust them to fit your document style.
Create A New Table
To insert a table, click the “Insert” menu. Select “Table” from the dropdown. A grid will appear to choose table size.
Drag the mouse over the grid to pick rows and columns. Click to insert the table into the document. The new table appears where the cursor is placed.
Adjust Table Size
After adding a table, you can change its size. Click on any cell border and drag to resize rows or columns. This adjusts the table to fit your content better.
You can also select the entire table and drag its edges. This changes the overall width or height of the table. Adjusting size helps fit tables side by side in your document.
Credit: alicekeeler.com
Use A Two-column Layout
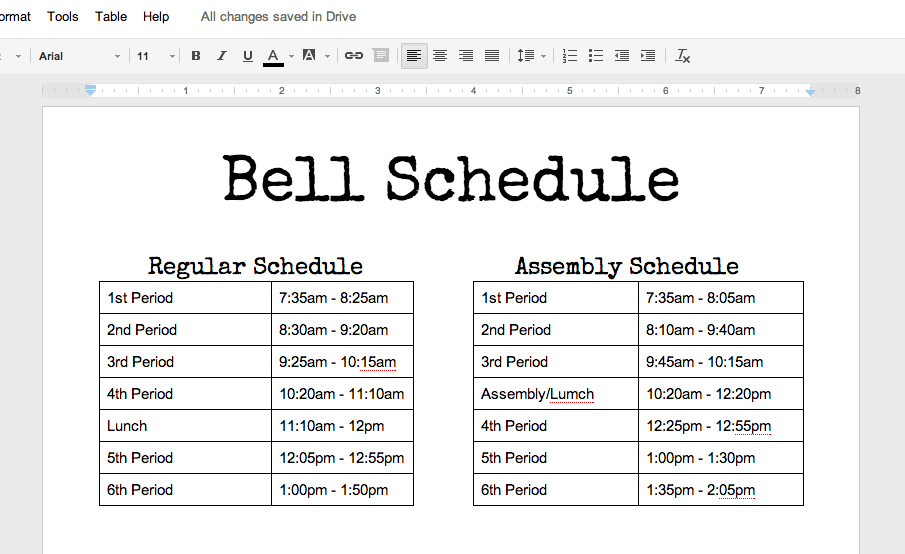
Using a two-column layout is a simple way to place tables side by side in Google Docs. This method keeps your document tidy. It also helps readers compare data easily.
You create two columns and insert one table in each. This layout works well for reports, schedules, and more. The steps below explain how to set it up quickly.
Set Up Columns
Open your Google Docs document. Click on the “Format” menu. Choose “Columns” from the dropdown list. Select the two-column option. Your page now splits into two vertical sections.
Adjust the spacing between columns if needed. Go to “Format” > “Columns” > “More options.” Set the spacing to your preference. This space keeps tables from touching each other.
Place Tables In Columns
Click in the first column where you want the first table. Insert the table by going to “Insert” > “Table.” Choose the number of rows and columns.
Repeat the same steps for the second table in the second column. You can type text above or below each table. The tables stay side by side as you add content.
Employ A Drawing Canvas
Employing a drawing canvas in Google Docs helps place tables side by side easily. The drawing canvas acts like a container. It holds your tables and keeps them aligned horizontally. This method avoids the usual spacing and formatting issues. You get more control over the layout. The tables stay fixed in position inside the canvas. This way, your document looks neat and organized.
Insert Drawing Tool
Start by opening your Google Docs document. Click on “Insert” in the top menu. Choose “Drawing” and then “New.” A drawing window opens. This is your canvas to work on. It lets you add shapes, text, and tables. The canvas size adjusts to fit your content. Use this space to arrange tables side by side.
Add Tables Inside Drawing
Inside the drawing window, click the “Table” icon. Pick the number of rows and columns you need. Add your first table. Then, add another table next to it. Drag and drop the tables to position them horizontally. Adjust the size to fit your content. Click “Save and Close” when done. The drawing with side-by-side tables appears in your document.
Align Tables With Tabs And Spaces
Aligning tables side by side in Google Docs can be tricky without using columns or drawings. Using tabs and spaces offers a simple way to place tables next to each other. This method keeps your document clean and easy to edit. It requires patience but gives you control over how the tables look. Below are steps to help you align tables using tabs and spaces.
Insert Tables Inline
Start by inserting the first table in your document. Place the cursor where you want the table to appear. Use the Insert menu and select Table. Choose the number of rows and columns you need. After the first table is in place, press the Tab key to move the cursor to the right. Insert the second table next to the first one. This keeps both tables on the same line.
Ensure there is enough space between the two tables. This prevents them from merging or overlapping. You may need to adjust the size of each table to fit them side by side.
Adjust Spacing Manually
After inserting tables inline, add spaces or tabs to create distance. Use the spacebar or Tab key to push the second table further right. Check the alignment by eye or use the ruler at the top of Google Docs. Adjust spacing until tables look balanced.
This method needs fine-tuning. Small changes in spaces or tabs can improve the look. Avoid using too many spaces, as it can break the layout on different devices. Keep checking how the tables appear on screen for the best fit.
Tips For Better Table Alignment
Aligning tables side by side in Google Docs can be tricky. Proper alignment makes your document look neat and professional. Small adjustments help keep tables balanced and easy to read. Follow these simple tips to improve how your tables line up.
Use Consistent Table Dimensions
Make sure both tables have the same width. This keeps them looking even and tidy. Check the number of columns and rows. Adjust cell sizes so they match across tables. Consistency avoids awkward gaps or overlaps.
Check Page Margins
Page margins affect table placement on the page. Narrow margins give more space for tables side by side. Wide margins may push tables too far apart. Adjust margins under File > Page Setup. Find a balance that fits your content well.
Credit: www.dailymotion.com
Common Issues And Fixes
Putting tables side by side in Google Docs can sometimes cause issues. These problems may affect the look and layout of your document. Knowing common issues helps fix them quickly. This section covers two frequent problems and how to solve them.
Tables Overlapping
Tables may overlap when there is not enough space on the page. This happens if the tables are too wide or placed too close. To fix this, reduce the width of each table. Click and drag the table edge to make it smaller. Another way is to add space between tables using the “Tab” key or extra columns.
Check the page margins too. Sometimes margins are too narrow, causing overlap. Go to File > Page Setup and increase the side margins. This gives more room for tables to sit side by side without touching.
Tables Not Aligning Properly
Misaligned tables look unprofessional and can confuse readers. If tables do not line up, check their size first. Make sure both tables have the same height and width. Use the table properties menu to set exact dimensions.
Also, use the table alignment options. Select a table, right-click, and choose Table properties. Set the alignment to left, center, or right. Align both tables the same way to keep them consistent.
Sometimes, invisible characters like spaces or line breaks push tables out of place. Show formatting marks to find these. Delete extra spaces or breaks to fix alignment.

Credit: www.youtube.com
Frequently Asked Questions
How Can I Place Two Tables Side By Side In Google Docs?
To place tables side by side, insert a single-row, two-column table first. Then, insert your tables into each cell. Adjust the cell width as needed. This method helps align tables neatly and keeps your document organized.
Can I Resize Tables To Fit Side By Side In Google Docs?
Yes, you can resize tables by dragging their borders. Adjust each table’s width to fit side by side. Make sure combined width does not exceed page margins. This keeps tables aligned without overlapping or breaking the layout.
Is It Possible To Align Tables Horizontally In Google Docs?
Google Docs does not support direct horizontal alignment for tables. Use a parent table with multiple columns to place tables side by side. This workaround maintains horizontal alignment and improves document readability.
Does Google Docs Support Floating Tables Side By Side?
Google Docs does not support floating tables like other editors. Use a parent table or columns to simulate side-by-side placement. This method keeps tables visually aligned and easy to manage.
Conclusion
Placing tables side by side in Google Docs is easier than it seems. You just need to follow simple steps to arrange your content neatly. This method helps keep your document organized and clear. It also saves space and makes your work look professional.
Practice these tips to improve your Google Docs skills. Soon, you will create better documents with side-by-side tables. Keep experimenting and enjoy working with Google Docs!
As an Amazon Associate, I earn from qualifying purchases.